Linux and Robotics
Linux is a Unix-based operating system. It is very popular with programmers and computer scientists because it’s simple and straightforward. They seem to enjoy the text-based interface of the terminal. Yet, for many others, including me, Linux can be very challenging. So, why in the world would I choose this environment for an introduction-to-robotics book? The answer to that question is threefold. First, when you work with robotics, you eventually have to confront Linux. That’s just a fact. You can do a lot without ever typing a single sudo command, but you will have limited capabilities. The sudo command stands for super user do in Linux. This tells the operating system that you are about to perform a protected function that requires more than general user access. You will learn more about this when we begin working with the Raspberry Pi. Second, Linux is challenging. As I stated before, this book will challenge you. If you have worked in Linux before, then this reason doesn’t apply to you. However, if you are new to Linux, the Raspberry Pi, or working in a command line, then some of the things that we do will be challenging. And that’s good. You’re learning something new and it should be a challenge.
Third, and this is by far the most important, the Raspberry Pi uses Linux. Yes, you can install other operating systems on the Pi, but it was designed and intended to use Linux. In fact, the Raspberry Pi has its own flavor of Linux called Raspbian. This is the recommended operating system, so it is what we’ll use. One of the nice things about using a prebuilt operating system, besides its ease of use, is many of the tools are already installed and ready to go.
Since we are using Linux, we will use command-line instructions extensively. This is where most new users have problems. Command-line code is entered via a terminal. Raspbian has a Windows-style interface that we will use, but much of it uses the terminal. A terminal window is available in the graphical user interface (GUI), so we will use that. However, when we set up the Pi, we will set it up to boot into terminal mode by default. Getting to the GUI is only a simple startx command.
Sensors and GPIO
GPIO stands for general-purpose input/output. It represents all the various connections to devices. The Raspberry Pi has a lot of GPIO options: HDMI, USB, audio, and so forth. However, when I talk about GPIO in this book, I’m generally referring to the 40-pin GPIO header. This header provides direct access to most of the board’s functionality. Arduino also has GPIO. In fact, one could argue that Arduino is all GPIO and nothing else. This isn’t far from the truth given that all the other connections are there to allow you to communicate with and power the AVR chip at the heart of the Arduino.
All of these headers and GPIO connections are there so we can access sensors outside the boards themselves. A sensor is a device that gathers data. There are many different types of sensors, and all serve a purpose. Sensors can be used for detecting light levels, the range to an object, temperature, speed, and so forth. In particular, we will use GPIO headers with an ultrasonic rangefinder and an IR detector.
Motion and Control
One thing that most definitions of a robot have in common is that it needs to be able to move. Sure, you can have a robot that doesn’t actually move, but this type of device generally falls under the moniker of IoT, the Internet of Things.
There are many ways to add motion to your project. The most common is the use of motors. But you can also use solenoids, air, or water pressure.
Although it is possible to drive a motor directly off a Raspberry Pi or an Arduino board, it is strongly discouraged. Motors tend to draw more current than the processors on the boards can handle. Instead, it is recommended that you use a motor controller. Like motors, motor controllers come in many forms. The motor control board that we will use is accessed through the Raspberry Pi’s header. I also discuss how to drive motors with an L298N dual motor controller.
Raspberry Pi and Arduino
We will use a Raspberry Pi in conjunction with an Arduino as our robot’s processing platform.
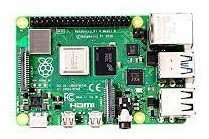

The Raspberry Pi is a single-board computer that is about the size of a credit card. Despite its small size, it is a very capable device. The Pi runs a version of Linux that was customized to work on the ARM processor that drives it. This puts a lot of functionality into a small device that is easy to embed into things like robots. But, although it is a great computer, there are a few places where it does not excel. One area is interfacing with external devices. It can work with sensors and external devices, but the Arduino does this much better.
Arduino is another small processing device that is readily available and easy to use. Unlike a Raspberry Pi, however, it does not have the capacity for a full operating system. Rather than running a microprocessor like the ARM, it uses a different type of chip called a microcontroller. The difference is that a microcontroller is specifically designed to interact with sensors, motors, lights, and all kinds of devices. It directly interacts with these external devices. The Pi works through many layers of processing before it ever reaches the pins that a device is connected to.
By combining the Raspberry Pi and the Arduino, we are able to leverage what each does best. The Raspberry Pi offers the high-level processing power of a full computer. Arduino provides the raw control over external devices. The Pi allows us to process a video stream from a simple USB camera; whereas the Arduino allows us to gather the information from the various sensors, and apply logic to make sense of all that data, and then return concise findings to the Pi.
Later on, you will connect an Arduino to the Pi and learn about programming it, as well as how to pass information back and forth between the Arduino and the Pi.
Raspberry Pi Troubleshooting
Troubleshooting common issues
One of the main strengths of the Raspberry Pi is its fantastic community. If you ever have any difficulties, consider stopping by the Raspberry Pi forums, which can be found at http://www.raspberrypi.org/forum/. Your question may have already been asked, and if not, there are thousands of enthusiastic Pi owners on hand to help.
Some of the most common issues are covered here:
My Raspberry Pi doesn’t boot (only the red power light comes on):
This suggests that the SD card was not written correctly. Try following the instructions again to copy an OS image onto your SD card, and if this fails, try a new SD card.
My Raspberry Pi randomly restarts by itself:
This is usually because the Pi is not receiving enough power. Double-check that your power supply is capable of supplying at least 700 mA (0.7A) at 5V. This should be written on the supply somewhere. Perhaps, try upgrading to a 1000 mA (1.0A) supply if you continue to have problems. Also, make sure that you do not have particularly power-hungry peripherals plugged into your Raspberry Pi. Some Wi-Fi dongles and keyboards with extremely bright LEDs can cause problems, for example.
I can’t enter my password on the login screen:
Nothing is shown when the password is entered (not even stars) to minimize the information that others can gain from seeing the screen. It is likely that the keys are still being recognized: try typing in the whole password blindly and pressing Enter.
The display does not fill my screen or extends beyond the edges:
This is because of the overscan settings. Many old televisions had cabinets which overlapped part of the screen, so images were given black borders to ensure that none of the picture was lost. Many modern monitors do not have this problem, however, so the black bars are just a nuisance. First, try enabling or disabling overscan by typing sudo raspi-config in a command line and selecting the appropriate option. If this still does not work, search the Internet for Raspberry Pi overscan troubleshooting for detailed guides.
I can’t see anything at all on the screen:
If the Pi is definitely on, and the OK/ACT light is lit or flashing, try pressing 1, 2, 3, or 4 on your keyboard to select different video modes.
My keyboard is behaving strangely:
Some wireless keyboards occasionally do not work as expected, for example, by registering double key presses or not noticing a keypress at all. This should be fixed in the future by software updates, or you can always try another keyboard if you have one.