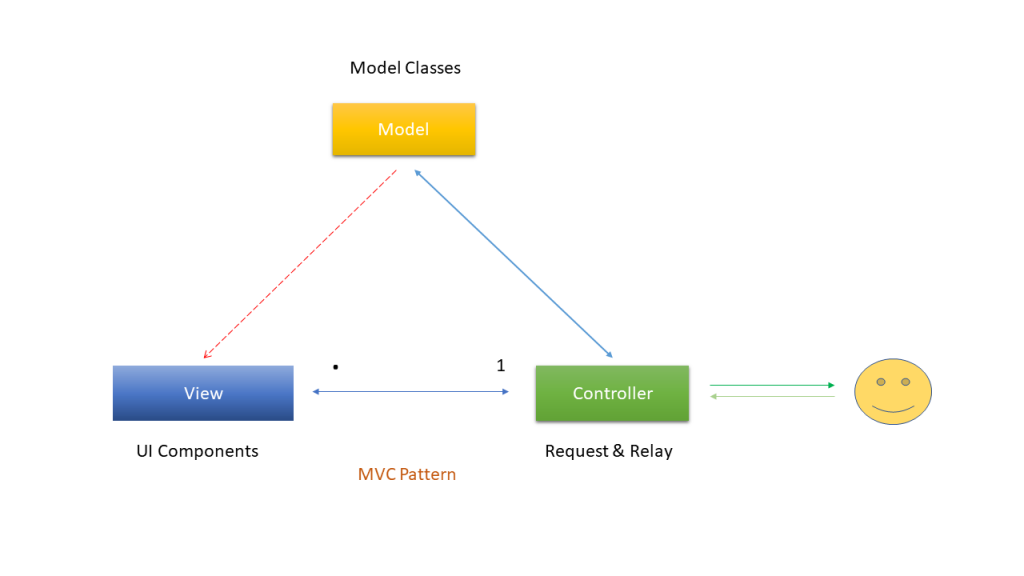
Q1. What is MVC?
Ans. MVC stands for Model-View-Controller. It is a software design pattern which was introduced in 1970s.
Also, MVC pattern forces a separation of concerns, it means domain model and controller logic are decoupled
from user interface (view). As a result maintenance and testing of the application become simpler and easier.
Q2. Explain MVC design pattern?
Ans. MVC design pattern splits an application into three main aspects: Model, View and Controller.
Model – The Model represents a set of classes that describe the business logic i.e. business model as well as data access operations i.e. data model. It also defines business rules for data means how the data can be changed and manipulated.
View – The View represents the UI components like CSS, jQuery, html etc. It is only responsible for displaying the
data that is received from the controller as the result. This also transforms the model(s) into UI
Controller – The Controller is responsible to process incoming requests. It receives input from users via the View,
then process the user’s data with the help of Model and passing the results back to the View. Typically, it acts as
the coordinator between the View and the Mode
Today, this pattern is used by many popular framework like as Ruby on Rails, Spring Framework, Apple iOS
Development and ASP.NET MVC
Q3. What is Domain Driven Design and Development?
Ans. Domain-Driven Design (DDD) is a collection of principles and patterns that help developers to take design
decisions to develop elegant systems for different domains. It is not a technology or methodology.
The main components of DDD are: Entity, Value Object, Aggregate, Service and Repository.
Entity- An object that has an identity- it is unique within the system, like Customer, Employee etc
Value Object- An object that has no identity within the system like Rate, State etc
Note : A value object can become an entity depending on the situation.
Aggregate: An aggregate root is a special kind of entity that consumers refer to directly. All consumers of the
aggregate root are called as aggregate. The aggregate root guarantees the consistency of changes being made
within the aggregate.
Service- A service is a way of dealing with actions, operations and activities within your application.
Repository- A repository is responsible to store and to retrieve your data. It is not a concern how and where data will be persist. So, it can be SQL server, oracle, xml, text file or anything else. Repository is not a Data Access Layer but it refers to a location for storage, often for safety or preservation.
Q4. What is MVP pattern?
Ans. This pattern is similar to MVC pattern in which controller has been replaced by the presenter. This design
pattern splits an application into three main aspects: Model, View and Presenter.
Model – The Model represents a set of classes that describes the business logic and data. It also defines business rules for data means how the data can be changed and manipulated.
View – The View represents the UI components like CSS, jQuery, html etc. It is only responsible for displaying the data that is received from the presenter as the result. This also transforms the model(s) into UI.
Presenter – The Presenter is responsible for handling all UI events on behalf of the view. This receive input from
users via the View, then process the user’s data with the help of Model and passing the results back to the View.
Unlike view and controller, view and presenter are completely decoupled from each other’s and communicate to
each other’s by an interface
Also, presenter does not manage the incoming request traffic as controller
This pattern is commonly used with ASP.NET Web Forms applications which require to create automated unit
tests for their code-behind pages. This is also used with windows forms
Key Points about MVP Pattern
- User interacts with the View.
- There is one-to-one relationship between View and Presenter means one View is mapped to only one
Presenter. - View has a reference to Presenter but View has not reference to Model.
- Provides two way communication between View and Presenter.
Q5. What is MVVM pattern?
Ans. MVVM stands for Model-View-View Model. This pattern supports two-way data binding between view
and View model. This enables automatic propagation of changes, within the state of view model to the View.
Typically, the view model uses the observer pattern to notify changes in the view model to model.
Model – The Model represents a set of classes that describes the business logic and data. It also defines business
rules for data means how the data can be changed and manipulated.
View – The View represents the UI components like CSS, jQuery, html etc. It is only responsible for displaying the
data that is received from the controller as the result. This also transforms the model(s) into UI.
View Model – The View Model is responsible for exposing methods, commands, and other properties that helps
to maintain the state of the view, manipulate the model as the result of actions on the view, and trigger events in the view itself.
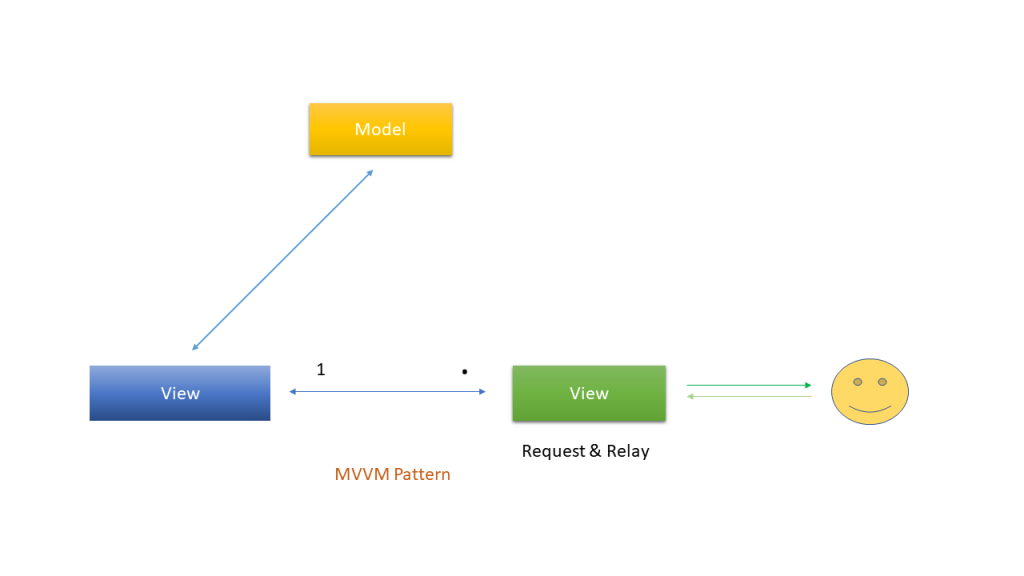
This pattern is commonly used by the WPF, Silverlight, Caliburn, nRoute etc
Key Points about MVVM Pattern
- User interacts with the View.
- There is many-to-one relationship between View and ViewModel means many View can be mapped to
one ViewModel. - View has a reference to ViewModel but View Model has no information about the View.
- Supports two-way data binding between View and ViewModel.
Q6. What is ASP.NET MVC?
Ans. ASP.NET MVC is an open source framework built on the top of Microsoft .NET Framework to develop web
application that enables a clean separation of code. ASP.NET MVC framework is the most customizable and
extensible platform shipped by Microsoft.
Q7. How MVC pattern works in ASP.NET MVC?
Ans. Working of MVC pattern in ASP.NET MVC is explained as below:
The Model in ASP.NET MVC
The Model in ASP.NET MVC can be broken down into several different layers as given below:
- Objects or View Model or Presentation Layer – This layer contains simple objects or complex objects which
are used to specify strongly-typed view. These objects are used to pass data from controller to stronglytyped view and vice versa. The classes for these objects can have specific validation rules which are
defined by using data annotations. Typically, these classes have those properties which you want to
display on corresponding view/page
- Business Layer – This layer helps you to implement your business logic and validations for your application.
This layer make use of Data Access Layer for persisting data into database. Also, this layer is directly
invoked by the Controller to do processing on input data and sent back to view. - Data Access Layer – This layer provides objects to access and manipulate the database of your application. Typically, this layer is made by using ORM tools like Entity Framework or NHibernate etc.
By default, models are stored in the Models folder of an ASP.NET MVC application.
The View in ASP.NET MVC
The view is only responsible for displaying the data that is received from the controller as a result. It also
responsible for transforming a model or models into UI which provide all the required business logic and validation to the view
By default, views are stored in the Views folder of an ASP.NET MVC applicationc
The Controller in ASP.NET MVC
The Controller in ASP.NET MVC, respond to HTTP requests and determine the action to take based upon the
content of the incoming request. It receives input from users via the View, then process the user’s data with the
help of Model and passing the results back to the View.
By default, controllers are stored in the Controllers folder an ASP.NET MVC application.
Q8. How Model, View and Controller communicate with each other in ASP.NET MVC?
Ans. There are following rules for communication among Model, View and Controller:
- User interacts with the Controller.
- There is one-to-many relationship between Controller and View means one controller can mapped to
multiple views. - Controller and View can have a reference to model.
- Controller and View can talk to each other
- Model and View cannot talk to each other directly. They communicate to each other with the help of
controller.
Q9. What are advantages of ASP.NET MVC?
Ans. There are following advantages of ASP.NET MVC over Web Forms (ASP.NET):
- Separation of concern – MVC design pattern divides the ASP.NET MVC application into three main aspects Model, View and Controller which make it easier to manage the application complexity.
- TDD – The MVC framework brings better support to test-driven development.
- Extensible and pluggable – MVC framework components were designed to be pluggable and extensible and therefore can be replaced or customized easier then Web Forms.
- Full control over application behaviour – MVC framework doesn’t use View State or server based forms like Web Forms. This gives the application developer more control over the behaviors of the application and also reduces the bandwidth of requests to the server.
- ASP.NET features are supported – MVC framework is built on top of ASP.NET and therefore can use most of the features that ASP.NET include such as the providers architecture, authentication and authorization scenarios, membership and roles, caching, session and more.
- URL routing mechanism – MVC framework supports a powerful URL routing mechanism that helps to build a more comprehensible and searchable URLs in your application. This mechanism helps to the application to be more addressable from the eyes of search engines and clients and can help in search engine optimization.
Q10. Explain brief history of ASP.NET MVC?
Ans. Here is the list of released version history of ASP.NET MVC Framework with theirs features
ASP.NET MVC1
- Released on Mar 13, 2009
- Runs on .NET 3.5 and with Visual Studio 2008 & Visual Studio 2008 SP1
- MVC Pattern architecture with WebForm Engine
- Html Helpers
- Ajax helpers
- Routing
- Unit Testing
ASP.NET MVC2
- Released on Mar 10, 2010
- Runs on .NET 3.5, 4.0 and with Visual Studio 2008 & 2010
- Strongly typed HTML helpers means lambda expression based Html Helpers
- Templated Helpers
- UI helpers with automatic scaffolding & customizable templates
- Support for DataAnnotations Attributes to apply model validation on both client and server sides
- Overriding the HTTP Method Verb including GET, PUT, POST, and DELETE
- Areas for partitioning a large applications into modules
- Asynchronous controllers
ASP.NET MVC3
- Released on Jan 13, 2011
- Runs on .NET 4.0 and with Visual Studio 2010
- The Razor view engine
- Enhanced Data Annotations attributes for model validation on both client and server sides
- Remote Validation
- Compare Attribute
- Session less Controller
- Child Action Output Caching
- Dependency Resolver
- Entity Framework Code First support
- Partial-page output caching
- ViewBag dynamic property for passing data from controller to view
- Global Action Filters
- Better JavaScript support with unobtrusive JavaScript, jQuery Validation, and JSON binding
- Use of NuGet to deliver software and manage dependencies throughout the platform
ASP.NET MVC4
- Released on Aug 15, 2012
- Runs on .NET 4.0, 4.5 and with Visual Studio 2010SP1 & Visual Studio 2012
- ASP.NET WEB API
- Enhancements to default project templates
- Mobile project template using jQuery Mobile
- Display Modes
- Task support for Asynchronous Controllers
- Bundling and minification
- Support for the Windows Azure SDK
ASP.NET MVC5
- Released on 17 October 2013
- Runs on .NET 4.5, 4.5.1 and with Visual Studio 2012 & Visual Studio 2013
- One ASP.NET
- ASP.NET Identity
- ASP.NET Scaffolding
- Authentication filters – run prior to authorization filters in the ASP.NET MVC pipeline
- Bootstrap in the MVC template
- ASP.NET WEB API2
Q11. What is difference between 3-layer architecture and MVC architecture?
Ans. 3-layer architecture separates the application into 3 components which consists of Presentation Layer
Business Layer and Data Access Layer. In 3-layer architecture, user interacts with the Presentation layer. 3-layer
is a linear architecture
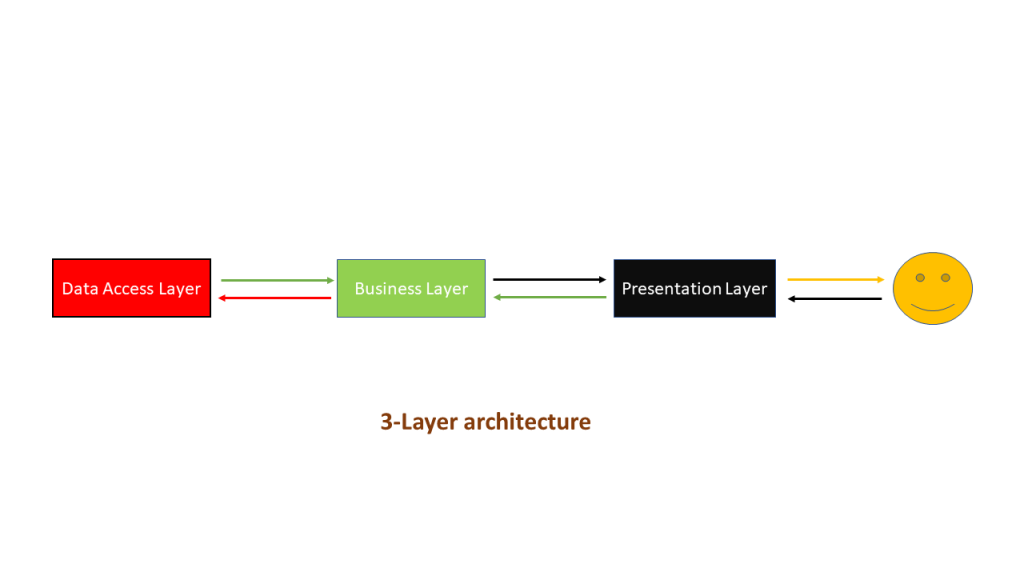
MVC architecture separates the application into three components which consists of Model, View and Controller. In MVC architecture, user interacts with the controller with the help of view. MVC is a triangle architecture.
Q12. What is difference between ASP.NET WebForm and ASP.NET MVC?
Ans. The main differences between ASP.NET Web Form and ASP.NET MVC are given below:
| ASP.NET Web forms | ASP.NET MVC |
| ASP.NET Web Form follows a traditional event driven development model. | ASP.NET MVC is a lightweight and follow MVC (Model, View, and Controller) pattern based development model |
| ASP.NET Web Form has server controls. | ASP.NET MVC has html helpers |
| ASP.NET Web Form has state management (like as view state, session) techniques | ASP.NET MVC has no automatic state management techniques |
| ASP.NET Web Form has file-based URLs means file name exist in the URLs must have its physically existence | ASP.NET MVC has route-based URLs means URLs are divided into controllers and actions and moreover it is based on controller not on physical file |
| ASP.NET Web Form follows WebForm Syntax | ASP.NET MVC follow customizable syntax (Razor as default) |
| In ASP.NET Web Form, Web Forms (ASPX) i.e. views are tightly coupled to Code behind (ASPX.CS) i.e. logic | In ASP.NET MVC, Views and logic are kept separately |
| ASP.NET Web Form has Master Pages for consistent look and feels | ASP.NET MVC has Layouts for consistent look and feels |
| ASP.NET Web Form has User Controls for code reusability. | ASP.NET MVC has Partial Views for code re-usability |
| ASP.NET Web Form has built-in data controls and best for rapid development with powerful data access | ASP.NET MVC is lightweight, provide full control over mark-up and support many features that allow fast & agile development. Hence it is best for developing interactive web application with latest web standards. |
| ASP.NET Web Form is not Open Source | ASP.NET Web MVC is an Open Source |
Q13. What is ViewModel in ASP.NET MVC?
Ans. In ASP.NET MVC, ViewModel is a class that contains the fields which are represented in the strongly-typed
view. It is used to pass data from controller to strongly-typed view.
Key Points about View Model
- View Model contain fields that are represented in the view (for LabelFor, EditorFor, DisplayFor helpers)
- View Model can have specific validation rules using data annotations.
- View Model can have multiple entities or objects from different data models or data source
Q14. Explain ASP.NET MVC pipeline?
Ans. The detail ASP.NET MVC pipeline is given below:
1.Routing – Routing is the first step in ASP.NET MVC pipeline. Typically, it is a pattern matching system that matches the incoming request to the registered URL patterns in the Route Table.
The UrlRoutingModule(System.Web.Routing.UrlRoutingModule) is a class which matches an incoming HTTP request to a registered route pattern in the RouteTable(System.Web.Routing.RouteTable).

2.Controller Initialization – The MvcHandler initiates the real processing inside ASP.NET MVC pipeline by using ProcessRequest method. This method uses the IControllerFactory instance (default is System.Web.Mvc.DefaultControllerFactory) to create corresponding controller.
3.Action Execution – Action execution occurs in the following steps:
- When the controller is initialized, the controller calls its own InvokeAction() method by passing the details
of the chosen action method. This is handled by the IActionInvoker. - After chosen of appropriate action method, model binders(default is System.Web.Mvc.DefaultModelBinder) retrieves the data from incoming HTTP request and do the data type conversion, data validation such as required or date format etc. and also take care of input values mapping to that action method parameters
- Authentication Filter was introduced with ASP.NET MVC5 that run prior to authorization filter. It is used
to authenticate a user. Authentication filter process user credentials in the request and provide a corresponding principal. Prior to ASP.NET MVC5, you use authorization filter for authentication and authorization to a user. - By default, Authenticate attribute is used to perform Authentication. You can easily create your own custom authentication filter by implementing IAuthentication Filter
- Authorization filter allow you to perform authorization process for an authenticated user. For example, Role based authorization for users to access resources.
- By default, Authorize attribute is used to perform authorization. You can also make your own custom authorization filter by implementing IAuthorization Filter
- Action filters are executed before (OnActionExecuting) and after (OnActionExecuted) an action is executed. I Action Filter interface provides you two methods On Action Executing and OnActionExecuted methods which will be executed before and after an action gets executed respectively. You can also make your own custom ActionFilters filter by implementing IActionFilter. For more about filters refer this article Understanding ASP.NET MVC Filters and Attributes
- When action is executed, it process the user inputs with the help of model (Business Model or Data Model)
and prepare Action Result.
4. Result Execution – Result execution occurs in the following steps:
- Result filters are executed before (OnResultExecuting) and after (OnResultExecuted) the ActionResult is executed. IResultFilter interface provides you two methods OnResultExecuting and OnResultExecuted methods which will be executed before and after an ActionResult gets executed respectively. You can also make your own custom ResultFilters filter by implementing IResultFilter.
- Action Result is prepared by performing operations on user inputs with the help of BAL or DAL. The Action
Result type can be ViewResult, PartialViewResult, RedirectToRouteResult, RedirectResult, ContentResult, JsonResult, FileResult and EmptyResult. - Various Result type provided by the ASP.NET MVC can be categorized into two category- ViewResult type
and NonViewResult type. The Result type which renders and returns an HTML page to the browser, falls into ViewResult category and other result type which returns only data either in text format, binary format or a JSON format, falls into NonViewResult category.
4.1 View Initialization and Rendering – View Initialization and Rendering execution occurs in the following steps:
- ViewResult type i.e. view and partial view are represented by IView (System.Web.Mvc.IView) interface and rendered by the appropriate View Engine.
- This process is handled by IViewEngine (System.Web.Mvc.IViewEngine) interface of the view engine. By default ASP.NET MVC provides WebForm and Razor view engines. You can also create your custom engine by using IViewEngine interface and can registered your custom view engine in to your ASP.NET MVC application as shown below:
- Html Helpers are used to write input fields, create links based on the routes, AJAX-enabled forms, links and much more. Html Helpers are extension methods of the HtmlHelper class and can be further extended very easily. In more complex scenario, it might render a form with client side validation with the help of JavaScript or jQuery.
Q15. What is Routing in ASP.NET MVC?
Ans. Routing is a pattern matching system that monitor the incoming request and figure out what to do with
that request. At runtime, Routing engine use the Route table for matching the incoming request’s URL pattern
against the URL patterns defined in the Route table. You can register one or more URL patterns to the Route table at Application_Start event.
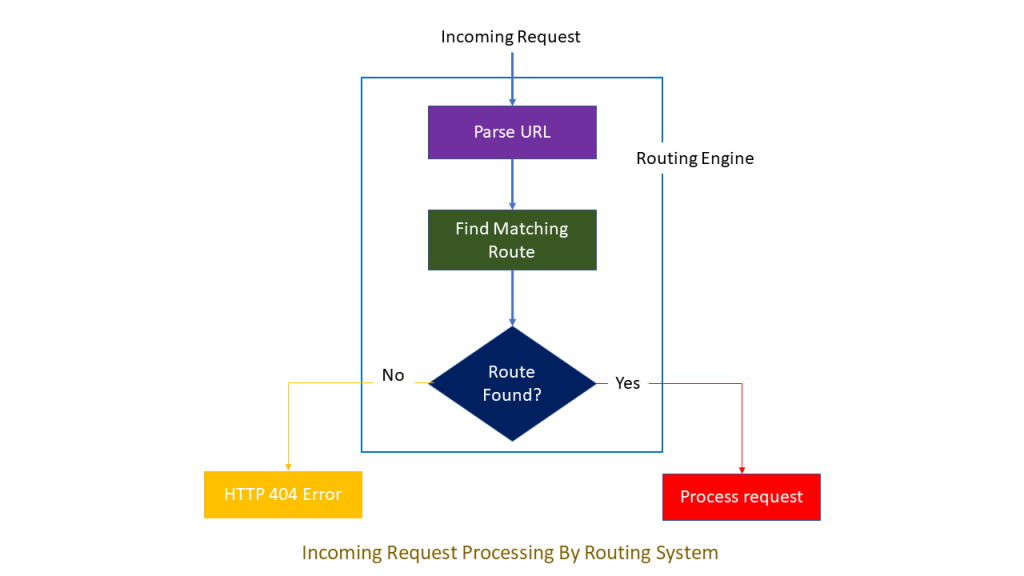
When the routing engine finds a match in the route table for the incoming request’s URL, it forwards the request to the appropriate controller and action. If there is no match in the route table for the incoming request’s URL, it returns a 404 HTTP status code.
Q16. How to define a route in ASP.NET MVC?
Ans. You can define a route in ASP.NET MVC as given below:
public static void RegisterRoutes(RouteCollection routes)
{
 routes.MapRoute(
 "Default", // Route name
 "{controller}/{action}/{id}", // Route Pattern
 new
 {
 controller = "Home",
 action = "Index",
 id = UrlParameter.Optional
 }// Default values for above defined parameters
 );
}
protected void Application_Start()
{
 RegisterRoutes(RouteTable.Routes);
 //TODO:
}
Always remember route name should be unique across the entire application. Route name can’t be duplicate
In above example we have defined the Route Pattern {controller}/{action}/{id} and also provide the default values for controller, action and id parameters. Default values means if you will not provide the values for controller or action or id defined in the pattern then these values will be serve by the routing system
Suppose your webapplication is running on www.example.com then the url pattren for you application will be
www.example.com/{controller}/{action}/{id}. Hence you need to provide the controller name followed by action
name and id if it is required. If you will not provide any of the value then default values of these parameters will
be provided by the routing system. Here is a list of URLs that match and don’t match this route pattern.
| Request URL | Parameters |
| https://example.com/ | controller=Home, action=Index, id=none, Since default value of controller and action are Home and Index respectively |
| https://example.com/Admin | controller=Admin, action=Index, id=none, Since default value of action is Index |
| https://example.com/Admin/Product | controller=Admin, action=Product, id=none |
| https://example.com/Admin/Product /1 | controller=Admin, action=Product, id=1 |
| https://example.com/Admin/Product/Sub Admin/1 | No Match Found |
| https://example.com/Admin/Product/Sub Admin/Add/1 | No Match Found |
Note: Always put more specific route on the top order while defining the routes, since routing system check the
incoming URL pattern form the top and as it get the matched route it will consider that. It will not checked further routes after matching pattern.
Q17. What is Attribute Routing and how to define it?
Ans. ASP.NET MVC5 and WEB API 2 supports a new type of routing, called attribute routing. In this routing,
attributes are used to define routes. Attribute routing provides you more control over the URIs by defining routes directly on actions and controllers in your ASP.NET MVC application and WEB API.
- Controller level routing – You can define routes at controller level which apply to all actions within the
controller unless a specific route is added to an action.
[RoutePrefix("MyHome")]
[Route("{action=index}")] //default action
public class HomeController : Controller
{
 //new route: /MyHome/Index
 public ActionResult Index()
 {
 return View();
 }
 //new route: /MyHome/About
 public ActionResult About()
 {
 ViewBag.Message = "Your application description page.";
 return View();
 }
 //new route: /MyHome/Contact
 public ActionResult Contact()
 {
 ViewBag.Message = "Your contact page.";
 return View();
 }
}- Action level routing – You can define routes at action level which apply to a specific action with in the
controller.
public class HomeController : Controller
{
 [Route("users/{id:int:min(100)}")] //route: /users/100
 public ActionResult Index(int id)
 {
 //TO DO:
 return View();
 }
[Route("users/about")] //route" /users/about
 public ActionResult About()
 {
 ViewBag.Message = "Your application description page.";
 return View();
 }
 //route: /Home/Contact
 public ActionResult Contact()
 {
 ViewBag.Message = "Your contact page.";
 return View();
 }
}
Note:
- Attribute routing should configure before the convention-based routing.
- When you combine attribute routing with convention-based routing, actions which do not have Route attribute for defining attribute-based routing will work according to convention-based routing. In above example Contact action will work according to convention-based routing.
- When you have only attribute routing, actions which do not have Route attribute for defining attribute-based routing will not be the part of attribute routing. In this way they can’t be access from outside as a URI.
Q18. When to use Attribute Routing?
Ans. The convention-based routing is complex to support certain URI patterns that are common in RESTful
APIs. But by using attribute routing you can define these URI patterns very easily.
For example, resources often contain child resources like Clients have orders, movies have actors, books have
authors and so on. It’s natural to create URIs that reflects these relations like as: /clients/1/orders
This type of URI is difficult to create using convention-based routing. Although it can be done, the results don’t
scale well if you have many controllers or resource types
With attribute routing, it’s pretty much easy to define a route for this URI. You simply add an attribute to the
controller action as:
[Route("clients/{clientId}/orders")]
public IEnumerable<Order> GetOrdersByClient(int clientId)
{
 //TO DO
}
Q19. How to enable Attribute Routing in ASP.NET MVC?
Ans. Enabling attribute routing in your ASP.NET MVC5 application is simple, just add a call to routes. MapMvcAttributeRoutes() method with in RegisterRoutes() method of RouteConfig.cs file.
public class RouteConfig
{
 public static void RegisterRoutes(RouteCollection routes)
 {
 routes.IgnoreRoute("{resource}.axd/{*pathInfo}");

 //enabling attribute routing
 routes.MapMvcAttributeRoutes();
 }
}
You can also combine attribute routing with convention-based routing.
public class RouteConfig
{
 public static void RegisterRoutes(RouteCollection routes)
 {
 routes.IgnoreRoute("{resource}.axd/{*pathInfo}");
 //enabling attribute routing
 routes.MapMvcAttributeRoutes();
 //convention-based routing
 routes.MapRoute(
 name: "Default",
 url: "{controller}/{action}/{id}",
 defaults: new { controller = "Home", action = "Index", id =
UrlParameter.Optional });
 }
}
Q20. How to define Attribute Routing for Area in ASP.NET MVC?
Ans. You can also define attribute routing for a controller that belongs to an area by using the RouteArea
attribute. When you define attribute routing for all controllers with in an area, you can safely remove the
AreaRegistration class for that area.
[RouteArea("Admin")]
[RoutePrefix("menu")]
[Route("{action}")]
public class MenuController : Controller
{
 // route: /admin/menu/login
 public ActionResult Login()
 {
 return View();
 }
 // route: /admin/menu/products
 [Route("products")]
 public ActionResult GetProducts()
{
 return View();
 }
 // route: /categories
 [Route("~/categories")]
 public ActionResult Categories()
 {
 return View();
 }
}
Q21. What is difference between Routing and URL Rewriting?
Ans. Many developers compare routing to URL rewriting since both look similar and can be used to make SEO friendly URLs. But both the approaches are very much different. The main difference between routing and url rewriting is given below:
- URL rewriting is focused on mapping one URL (new url) to another URL (old url) while routing is focused on mapping a URL to a resource.
- URL rewriting rewrites your old url to new one while routing never rewrite your old url to new one but it map to the original route
Q22. What is Route Constraints in ASP.NET MVC?
Ans. Route constraints is way to put some validation around the defined route
Creating Route Constraints
Suppose we have defined the following route in our application and you want to restrict the incoming request url with numeric id only.Now let’s see how to do it with the help of regular expression.
public static void RegisterRoutes(RouteCollection routes)
{
 routes.MapRoute(
 "Default", // Route name
 "{controller}/{action}/{id}", // Route Pattern
 new
 {
 controller = "Home",
 action = "Index",
 id = UrlParameter.Optional
 } // Default values for parameters
 );
}
Restrict to numeric id only
public static void RegisterRoutes(RouteCollection routes)
{
 routes.MapRoute(
 "Default", // Route name
 "{controller}/{action}/{id}", // Route Pattern
 new
 {
 controller = "Home",
 action = "Index",
 id = UrlParameter.Optional
 }, // Default values for parameters
 new { id = @"\d+" } //Restriction for id
 );
}
Now for this route, routing engine will consider only those URLs which have only numeric id like as
http://example.com/Admin/Product/1 else it will considers that url is not matched with this route.
Q23. How route table is created in ASP.NET MVC?
Ans. When an MVC application first starts, the Application_Start() method in global.asax is called. This method
calls the RegisterRoutes() method. The RegisterRoutes() method creates the route table for MVC application.
Q24. What are important namespaces in ASP.NET MVC?
Ans. There are some important namespaces as given below:
- System.Web.Mvc – This namespace contains classes and interfaces that support the MVC pattern for ASP.NET Web applications. This namespace includes classes that represent controllers, controller factories, action results, views, partial views, and model binders.
- System.Web.Mvc.Ajax – This namespace contains classes that supports Ajax scripting in an ASP.NET MVC application. The namespace includes support for Ajax scripts and Ajax option settings as well.
- System.Web.Mvc.Html – This namespace contains classes that help render HTML controls in an MVC application. This namespace includes classes that support forms, input controls, links, partial views, and validation.
Q25. What is View Engine?
Ans. A View Engine is a MVC subsystem which has its own markup syntax. It is responsible for converting serverside template into HTML markup and rendering it to the browser. Initially, ASP.NET MVC ships with one view engine, web forms (ASPX) and from ASP.NET MVC3 a new view engine, Razor is introduced. With ASP.NET MVC, you can also use other view engines like Spark, NHaml etc.
Q26. How View Engine works?
Ans. Each view engine has following three main components:
- ViewEngine class – This class implements the IViewEngine interface and responsible for locating view
templates. - View class – This class implements the IView interface and responsible for combining the template with
data from the current context and convert it to output HTML markup. - Template parsing engine – This parses the template and compiles the view into executable code.
Q27. What is Razor View Engine?
Ans. Razor Engine is an advanced view engine that was introduced with MVC3. This is not a new language but
it is a new markup syntax. Razor has new and advance syntax that are compact, expressive and reduces typing.
Razor syntax are easy to learn and much clean than Web Form syntax. Razor uses @ symbol to write markup as:
@Html.ActionLink("SignUp", "SignUp")Q28. How to make Custom View Engine?
Ans. ASP.NET MVC is an open source and highly extensible framework. You can create your own View engine
by Implementing IViewEngine interface or by inheriting VirtualPathProviderViewEngine abstract class.
public class CustomViewEngine : VirtualPathProviderViewEngine
{
 public CustomViewEngine()
 {
 // Define the location of the View and Partial View
 this.ViewLocationFormats = new string[] { "~/Views/{1}/{0}.html",
"~/Views/Shared/{0}.html" };
 this.PartialViewLocationFormats = new string[] { "~/Views/{1}/{0}.html",
"~/Views/Shared/{0}.html" };
 }
 protected override IView CreatePartialView(ControllerContext
controllerContext, string partialPath)
 {
 var physicalpath =
controllerContext.HttpContext.Server.MapPath(partialPath);
 return new CustomView(physicalpath);
 }
 protected override IView CreateView(ControllerContext controllerContext,
string viewPath, string masterPath)
 {
 var physicalpath =
controllerContext.HttpContext.Server.MapPath(viewPath);
 return new CustomView(physicalpath);
 }
}
public class CustomView : IView
{
 private string _viewPhysicalPath;
 public CustomView(string ViewPhysicalPath)
 {
 _viewPhysicalPath = ViewPhysicalPath;
 }
 public void Render(ViewContext viewContext, System.IO.TextWriter writer)
 {
 //Load File
 string rawcontents = File.ReadAllText(_viewPhysicalPath);
 //Perform Replacements
 string parsedcontents = Parse(rawcontents, viewContext.ViewData);
 writer.Write(parsedcontents);
 }
 public string Parse(string contents, ViewDataDictionary viewdata)
 {
 return Regex.Replace(contents, "\\{(.+)\\}", m => GetMatch(m, viewdata));
 }
 public virtual string GetMatch(Match m, ViewDataDictionary viewdata)
 {
 if (m.Success)
 {
 string key = m.Result("$1");
 if (viewdata.ContainsKey(key))
 {
 return viewdata[key].ToString();
 }
 }
 return string.Empty;
 }
}
Q29. How to register Custom View Engine in ASP.NET MVC?
Ans. To use your custom View Engine, you need to register it by using global.asax.cs file Application_Start()
method, so that the framework will use your custom View Engine instead of the default one
protected void Application_Start()
{
 //Register Custom View Engine
 ViewEngines.Engines.Add(new CustomViewEngine());

 //other code is removed for clarity
}
Q30. Can you remove default View Engine in ASP.NET MVC?
Ans. Yes, you can remove default view engines (Razor and WebForm) provided by ASP.NET MVC
protected void Application_Start()
{
 //Remove All View Engine including Webform and Razor
 ViewEngines.Engines.Clear();
}
Q31. What is difference between Razor and WebForm engine?
Ans. The main differences between ASP.NET Web Form and ASP.NET MVC are given below:
| Razor View Engine | Webform View Engine |
| Razor Engine is an advanced view engine that was introduced with MVC3. This is not a new language but it is a new markup syntax | Web Form Engine is the default view engine for the Asp.net MVC that is included with Asp.net MVC from the beginning. |
| Razor Engine is an advanced view engine that was introduced with MVC3. This is not a new language but it is a new markup syntax. | Web Form Engine is the default view engine for the Asp.net MVC that is included with Asp.net MVC from the beginning |
| The namespace for Razor Engine is System.Web.Razor | The namespace for Webform Engine is System.Web.Mvc.WebFormViewEngine |
| The file extensions used with Razor Engine are different from Web Form Engine. It has .cshtml (Razor with C#) or .vbhtml (Razor with VB) extension for views, partial views, editor templates and for layout pages. | The file extensions used with Web Form Engine are also like Asp.net Web Forms. It has .aspx extension for views, .ascx extension for partial views & editor templates and .master extension for layout/master pages. |
| Razor has new and advance syntax that are compact, expressive and reduces typing. | Web Form Engine has the same syntax like Asp.net Web Forms uses for .aspx pages |
| Razor syntax are easy to learn and much clean than Web Form syntax. Razor uses @ symbol to make the code like as: @Html.ActionLink(“SignUp”, “SignUp”) | Web Form syntax are borrowed from Asp.net Web Forms syntax that are mixed with html and sometimes make a view messy. Webform uses <% and %> delimiters to make the code like as: <%: Html.ActionLink(“SignUp”, “SignUp”) %> |
| By default, Razor Engine prevents XSS attacks (Cross-Site Scripting Attacks) means it encodes the script or html tags like <, > before rendering to view | Web Form Engine does not prevent XSS attacks means any script saved in the database will be fired while rendering the page |
| Razor Engine is little bit slow as compared to Webform Engine | Web Form Engine is faster than Razor Engine. |
| Razor Engine, doesn’t support design mode in visual studio means you cannot see your page look and feel | Web Form engine support design mode in visual studio means you can see your page look and feel without running the application |
| Razor Engine support TDD (Test Driven Development) since it is not depend on System.Web.UI.Page class. | Web Form Engine doesn’t support TDD (Test Driven Development) since it depend on System.Web.UI.Page class which makes the testing complex. |
Q32. What are HTML Helpers in ASP.NET MVC?
Ans. An HTML Helper is just a method that returns a HTML string. The string can represent any type of content that you want. For example, you can use HTML Helpers to render standard HTML tags like HTML , and tags etc.
You can also create your own HTML Helpers to render more complex content such as a menu strip or an HTML
table for displaying database data.
Q33. What are different types of HTML Helpers?
Ans. There are three types of HTML helpers as given below:
- Inline Html Helpers – These are create in the same view by using the Razor @helper tag. These helpers
can be reused only on the same view
@helper ListingItems(string[] items)
{
 <ol>
 @foreach (string item in items)
 {
 <li>@item</li>
 }
 </ol>
}
<h3>Programming Languages:</h3>
@ListingItems(new string[] { "C", "C++", "C#" })
<h3>Book List:</h3>
@ListingItems(new string[] { "How to C", "how to C++", "how to C#" })- Built-In Html Helpers – Built-In Html Helpers are extension methods on the HtmlHelper class. The Built-In
Html helpers can be divided into three categories-
Standard Html Helpers – These helpers are used to render the most common types of HTML elements like as HTML text boxes, checkboxes etc. A list of most common standard html helpers is given below:
| HTML Element | Example |
| TextBox | @Html.TextBox(“Textbox1”, “val”) Output: |
| TextArea | @Html.TextArea(“Textarea1”, “val”, 5, 15, null) Output: val |
| Password | @Html.Password(“Password1”, “val”) Output: |
| Hidden Field | @Html.Hidden(“Hidden1”, “val”) Output: |
- Strongly Typed HTML Helpers – These helpers are used to render the most common types of HTMLelements in strongly typed view like as HTML text boxes, checkboxes etc. The HTML elements are created based on model properties.
The strongly typed HTML helpers work on lambda expression. The model object is passed as a value to lambda expression, and you can select the field or property from model object to be used to set the id, name and value attributes of the HTML helper. A list of most common strongly-typed html helpers is given below:
| HTML Element | Example |
| TextBox | @Html.TextBoxFor(m=>m.Name) Output: |
| TextArea | @Html.TextArea(m=>m.Address , 5, 15, new{})) Output: Addressvalue |
| Password | @Html.PasswordFor(m=>m.Password) Output: |
| Hidden Field | @Html.HiddenFor(m=>m.UserId) Output: |
| CheckBox | @Html.CheckBoxFor(m=>m.IsApproved) Output: |
| RadioButton | @Html.RadioButtonFor(m=>m.IsApproved, “val”) Output: |
| Drop-down list | @Html.DropDownListFor(m => m.Gender, new SelectList(new [] {“Male”, “Female”})) Output: Male Female |
| Multiple-select | Html.ListBoxFor(m => m.Hobbies, new MultiSelectList(new [] {“Cricket”, “Chess”})) Output: Cricket Chess |
Templated HTML Helpers – These helpers figure out what HTML elements are required to render based
on properties of your model class. This is a very flexible approach for displaying data to the user, although
it requires some initial care and attention to set up. To setup proper HTML element with Templated HTML
Helper, make use of DataType attribute of DataAnnitation class.
For example, when you use DataType as Password, A templated helper automatically render Password
type HTML input element.
| Templated Helper | Example |
| Display | Renders a read-only view of the specified model property and selects an appropriate HTML element based on property’s data type and metadata. Html.Display(“Name”) |
| DisplayFor | Strongly typed version of the previous helper Html.DisplayFor(m => m. Name) |
| Editor | Renders an editor for the specified model property and selects an appropriate HTML element based on property’s data type and metadata. Html.Editor(“Name”) |
| EditorFor | Strongly typed version of the previous helper Html.EditorFor(m => m. Name) |
- Custom Html Helpers – You can also create your own custom helper methods by creating an extension
method on the HtmlHelper class or by creating static methods with in a utility class
public static class CustomHelpers
{
 //Submit Button Helper
 public static MvcHtmlString SubmitButton(this HtmlHelper helper, string

buttonText)
 {
 string str = "<input type=\"submit\" value=\"" + buttonText + "\"
/>";
 return new MvcHtmlString(str);
 }
 //Readonly Strongly-Typed TextBox Helper
 public static MvcHtmlString TextBoxFor<TModel, TValue>(this
 HtmlHelper<TModel> htmlHelper, Expression<Func<TModel,
TValue>>expression, bool isReadonly)
 {
 MvcHtmlString html = default(MvcHtmlString);
 if (isReadonly)
 {
 html = System.Web.Mvc.Html.InputExtensions.TextBoxFor(htmlHelper,
 expression, new { @class = "readOnly",
 @readonly = "read-only" });
 }
 else
 {
 html = System.Web.Mvc.Html.InputExtensions.TextBoxFor(htmlHelper,
 expression);
 }
 return html;
 }
}
Q34. What are Url Helpers?
Ans. Url helpers allows you to render HTML links and raw URLs. The output of these helpers is dependent on
the routing configuration of your ASP.NET MVC application
| HTML Element | Example |
| Relative URL | @Url.Content(“~/Files/asp.netmvc.pdf”) Output: /Files/asp.netmvc.pdf |
| Based on action/controller | @Html.ActionLink(“About Us”, “About”, “Home”) Output: About Us |
| @Html.ActionLink(“About Me”, “About”, “Home”, “http”,”www.dotnet-tricks.com”, null,null,null) Output: About Me |
Q35. What is Validation Summary?
Ans. The ValidationSummary helper displays an unordered list of all validation errors in the ModelState dictionary. It accepts a boolean value (i.e. true or false) and based on boolean value it display the errors. When boolean parameter value istrue, itshows only model-level errors and excludes model property-level errors (i.e any errors that are associated with a specific model property). When Boolean value is false, it shows both model-level and property-level errors.
Suppose, you have the following lines of code somewhere in the controller action rendering a view:
ModelState.AddModelError("", "This is Model-level error!");
ModelState.AddModelError("Name", "This Model property-level error!");
In the first error there is no key to associate this error with a specific property. In the second error there is a
key named as “Title” to associate this error for model property Title.
@Html.ValidationSummary(true) @*//shows model-level errors*@
@Html.ValidationSummary(false) @*//shows model-level and property-level errors*@
Hence, when boolean type parameter value is true then ValidationSummary will display only model-level errors
and exclude property-level errors. It will display Model-level and property-level errors, when boolean type
parameter value is false
Q36. What are AJAX Helpers?
Ans. AJAX Helpers are used to create AJAX enabled elements like as Ajax enabled forms and links which
performs request asynchronously. AJAX Helpers are extension methods of AJAXHelper class which exist in
System.Web.Mvc namespace.
| AJAX HTML Element | Example |
| AJAX-enabled link based on action/controller | @Ajax.ActionLink(“Load Products”, “GetProducts”, new AjaxOptions {UpdateTargetId = “Products-container”, HttpMethod = “GET” }) Output: Load Products |
Q37. What is unobtrusive AJAX?
Ans. ASP.NET MVC supports unobtrusive Ajax which is based on jQuery. The unobtrusive Ajax means that you
use helper methods to define your Ajax features, rather than adding blocks of code throughout your views.
Q38. What are various configuration options for AJAX Helpers?
Ans. The AjaxOptions class defines properties that allow you to specify callbacks for different stages in the AJAX
request life cycle. There are following properties provided by AjaxOptions class for AJAX helpers:
| Property | Description |
| Url | Specify the URL that will be requested from the server |
| Confirm | Specify a message that will be displayed in a confirm dialog to the end user. When user clicks on OK button in the confirmation dialog, the Ajax call performs |
| OnBegin | Specify a JavaScript function name which is called at the beginning of the Ajax request |
| OnComplete | Specify a JavaScript function name which is called at the end of the Ajax request |
| OnSuccess | Specify a JavaScript function name which is called when the Ajax request is successful |
| OnFailure | Specify a JavaScript function name which is called if the Ajax request fails |
| LoadingElementId | Specify progress message container’s Id to display a progress message or animation to the end user while an Ajax request is being made. |
| LoadingElementDuration | Specify a time duration in milliseconds that controls the duration of the progress message or animation. |
| UpdateTargetId | Specify the target container’s Id that will be populated with the HTML returned by the action method |
| InsertionMode | Specify the way of populating the target container. The possible values are InsertAfter, InsertBefore and Replace (which is the default) |
Q39. What is Cross Domain AJAX?
Ans. By default, web browsers allows AJAX calls only to your web application’s site of origin i.e. site hosted
server. This restriction help us to prevent various security issues like cross site scripting (XSS) attacks. But,
sometimes you need to interact with externally hosted API(s) like Twitter or Google. Hence to interact with these
external API(s) or services your web application must support JSONP requests or Cross-Origin Resource Sharing
(CORS). By default, ASP.NET MVC does not support JSONP or Cross-Origin Resource Sharing. For this you need to
do a little bit of coding and configuration.
Q40. What are Layouts in ASP.NET MVC?
Ans. Layouts are used to maintain a consistent look and feel across multiple views within ASP.NET MVC
application. As compared to Web Forms, layouts serve the same purpose as master pages, but offer a simple
syntax and greater flexibility. A basic structure of layout is given below:
<!DOCTYPE html>
<html>
<head>
 <meta charset="utf-8" />
 <meta name="viewport" content="width=device-width" />
 <title>@ViewBag.Title</title>
 @Styles.Render("~/Content/css")
 @Scripts.Render("~/bundles/modernizr")
</head>
<body>
 @RenderBody()
 @Scripts.Render("~/bundles/jquery")
 @RenderSection("scripts", required: false)
</body>
</html>
You can use a layout to define a common template for your site. A layout can be declared at the top of view as:
@{
 Layout = "~/Views/Shared/SiteLayout.cshtml";
}
Q41. What are Sections in ASP.NET MVC?
Ans. A section allow you to specify a region of content within a layout. It expects one parameter which is the
name of the section. If you don’t provide that, an exception will be thrown. A section in a layout page can be
defined by using the following code.
@section header{
<h1>Header Content</h1>
}
You can render above defined section header on the content page as given below:
@RenderSection("header")
By default, sections are mandatory. To make sections optional, just provides the second parameter value as false,
which is a Boolean value.
@RenderSection("header",false)
Note: A view can define only those sections that are referred to in the layout page otherwise an exception will be
thrown.
Q42. What are RenderBody and RenderPage in ASP.NET MVC?
Ans. RenderBody method exists in the Layout page to render child page/view. It is just like the ContentPlaceHolder on master page. A layout page can have only one Render Body method
<body>
@RenderBody()
@RenderPage("~/Views/Shared/_Header.cshtml")
@RenderPage("~/Views/Shared/_Footer.cshtml")
@RenderSection("scripts",false)
@section scripts{
 <script src="~/Scripts/jquery-1.7.1.min.js"></script>
}
</body>
RenderPage method also exists in the Layout page to render other page exists in your application. A layout page
can have multiple RenderPage method.
@RenderPage("~/Views/Shared/_Header.cshtml")
Q43. What are Styles.Render and Scripts.Render?
Ans. Style.Render is used to render a bundle of CSS files defined within BundleConfig.cs files. Styles.Render
create style tag(s) for the CSS bundle. Like Style.Render, Scripts.Render is also used to render a bundle of Script
files by rendering script tag(s) for the Script bundle
public class BundleConfig
{
 public static void RegisterBundles(BundleCollection bundles)
 {
 bundles.Add(new ScriptBundle("~/bundles/jqueryval").Include(
 "~/Scripts/jquery.unobtrusive*",
 "~/Scripts/jquery.validate*"));
 bundles.Add(new StyleBundle("~/Content/themes/base/css").Include(
 "~/Content/themes/base/jquery.ui.core.css",
 "~/Content/themes/base/jquery.ui.resizable.css",
 "~/Content/themes/base/jquery.ui.selectable.css",
 "~/Content/themes/base/jquery.ui.button.css",
 "~/Content/themes/base/jquery.ui.dialog.css",
 "~/Content/themes/base/jquery.ui.theme.css"));
 }
Styles.Render and Scripts.Render generate multiple style and script tags for each item in the CSS bundle and
Script bundle when optimizations are disabled. When optimizations are enabled, Styles.Render and
Scripts.Render generate a single style and script tag to a version-stamped URL which represents the entire
bundle for CSS and Scripts.
Q44. How to enable and disable optimizations in ASP.NET MVC?
Ans. You can enable and disable optimizations by setting EnableOptimizations property of BundleTable class
to true or false with in Global.asax.cs file as shown below
protected void Application_Start()
{
 //other code has been removed for clarity
 //disable optimization
 System.Web.Optimization.BundleTable.EnableOptimizations = false;
}
Q45. What is ViewStart?
Ans. _ViewStart.cshml page is used to serve common layout page(s) for a group of views. The code within this
file is executed before the code in any view placed in the same directory. This file is also recursively applied to any
view within a subdirectory
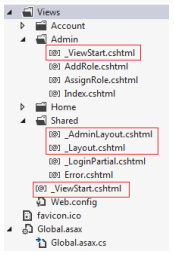
By default ASP.NET MVC project has a _ViewStart.cshtml file in the Views directory and it specifies a default
layout for your ASP.NET MVC application as shown below:
@{
 Layout = "~/Views/Shared/Layout.cshtml";
}
Since this code runs before any view, hence a view can override the Layout property and choose a different layout
Q46. When to use _ViewStart?.
Ans. When a set of views shares common settings, the _ViewStart.cshtml file is a great place to put these
common view settings. If any view needs to override any of the common settings then that view can set new
values to common settings.
Q47. What are different ways of rendering layout in ASP.NET MVC?
Ans. There are following four different ways of rendering layout in ASP.NET MVC:
- Using _ViewStart file in the root directory of the Views folder: The _ViewStart file with in Views folder is
used to server the default Layout page for your ASP.NET MVC application. You can also change the default
rendering of layouts with in _ViewStart file based on controller as shown below:
@{
 var controller =
HttpContext.Current.Request.RequestContext.RouteData.Values["Controller"].ToSt
ring();
 string layout = "";
 if (controller == "Admin")
 {
 layout = "~/Views/Shared/_AdminLayout.cshtml";
 }
 else
 {
 layout = "~/Views/Shared/_Layout.cshtml";
 }
 Layout = layout;
}- Adding _ViewStart file in each of the directories
You can also set the default layout for a particular directory by putting _View Start file in each of the directories
with the required Layout information as shown below:
- Defining Layout with in each view on the top
@{
 Layout = "~/Views/Shared/_AdminLayout.cshtml";
}
- Returning Layout from ActionResult
public ActionResult Index()
{
 RegisterModel model = new RegisterModel();
 //TO DO:
 return View("Index", "_AdminLayout", model);
}
Q48. What is App_Start folder in ASP.NET MVC?
Ans. App_Start folder has been introduced in MVC4. It contains various configurations files like as
BundleConfig.cs, FilterConfig.cs, RouteConfig.cs, WebApiConfig.cs for your application. All these settings are
registered within Application_Start method of Global.asax.cs file
- BundleConfig.cs – This is used to create and register bundles for CSS and JS files. By default, various bundles are added in this files including jQuery, jQueryUI, jQuery validation, Modernizr, and Site CSS.
- FIlterConfig.cs – This is used to register global MVC filters like error filters, actions filters etc. By default it contains HandleErrorAttribute filter.
- RouteConfig.cs – This is used to register various route patterns for your ASP.NET MVC application. By default, one route is registered here named as Default Route.
- WebApiConfig.cs – This is used to register various WEB API routes like as ASP.NET MVC, as well as set any additional WEB API configuration settings.
Q49. What are different ways of returning/rendering a view in ASP.NET MVC?
Ans. There are four different ways for returning/rendering a view in ASP.NET MVC as given below:
- Return View() – This tells MVC to generate HTML to be displayed for the specified view and sends it to the browser. This acts like as Server.Transfer() in ASP.NET WebForm
- Return RedirectToAction() – This tells MVC to redirect to specified action instead of rendering HTML. In this case, browser receives the redirect notification and make a new request for the specified action. This acts like as Response.Redirect() in ASP.NET WebForm.
- Moreover, RedirectToAction construct a redirect url to a specific action/controller in your application and use the route table to generate the correct URL. RedirectToAction cause the browser to receive a 302 redirect within your application and gives you an easier way to work with your route table.
- Return Redirect() – This tells MVC to redirect to specified URL instead of rendering HTML. In this case, browser receives the redirect notification and make a new request for the specified URL. This also acts like as Response.Redirect() in ASP.NET WebForm. In this case, you have to specify the full URL to redirect.
- Moreover, Redirect also cause the browser to receive a 302 redirect within your application, but you have to construct the URLs yourself
- Return RedirectToRoute() – This tells MVC to look up the specifies route into the Route table that is definedin global.asax and then redirect to that controller/action defined in that route. This also make a new request like RedirectToAction().
Note:
- Return View doesn’t make a new requests, it just renders the view without changing URLs in the browser’s
address bar. - Return RedirectToAction makes a new requests and URL in the browser’s address bar is updated with the
generated URL by MVC. - Return Redirect also makes a new requests and URL in the browser’s address bar is updated, but you have to
specify the full URL to redirect - Between RedirectToAction and Redirect, best practice is to use RedirectToAction for anything dealing with
your application actions/controllers. If you use Redirect and provide the URL, you’ll need to modify those URLs
manually when you change the route table. - RedirectToRoute redirects to a specific route defined in the Route table.
Q50. What are differences among ViewData, ViewBag, TempData and Session?
Ans. In ASP.NET MVC there are three ways – ViewData, ViewBag and TempData to pass data from controller to
view and in next request. Like WebForm, you can also use Session to persist data during a user session.
ViewData
- ViewData is a dictionary object that is derived from ViewDataDictionary class
public ViewDataDictionary ViewData { get; set; }- ViewData is used to pass data from controller to corresponding view.
- Its life lies only during the current request.
- If redirection occurs then its value becomes null.
- It’s required typecasting for getting data and check for null values to avoid error
ViewBag
- ViewBag is a dynamic property that takes advantage of the new dynamic features in C# 4.0
public ViewDataDictionary ViewData { get; set; }
- Basically it is a wrapper around the ViewData and also used to pass data from controller to corresponding
view. - Its life also lies only during the current request.
- If redirection occurs then its value becomes null.
- It doesn’t required typecasting for getting data.
TempData
- TempData is a dictionary object that is derived from TempDataDictionary class and stored in short lives session
public TempDataDictionary TempData { get; set; }- TempData is used to pass data from current request to subsequent request (means redirecting from one page to another).
- Its life is very short and lies only till the target view is fully loaded.
- It’s required typecasting for getting data and check for null values to avoid error.
- It’s used to store only one time messages like error messages, validation messages.
Session
- In ASP.NET MVC, Session is a property of Controller class whose type is HttpSessionStateBase
public HttpSessionStateBase Session { get; }
- Session is also used to pass data within the ASP.NET MVC application and Unlike TempData, it persist data for a user session until it is time out (by default session timeout is 20 minutes).
- Session is valid for all requests, not for a single redirect.
- It’s also required typecasting for getting data and check for null values to avoid error
Q51. How to persist data in TempData?
Ans. The life of TempData is very short and lies only till the target view is fully loaded. But you can persist data
in TempData by calling Keep() method after request completion.
- void Keep() – Calling this method with in the current action ensures that all the items in TempData are not removed at the end of the current request.
public ActionResult Index()
{
 ViewBag.Message = TempData["Message"];
 Employee emp = TempData["emp"] as Employee; //need type casting
 TempData.Keep();//persist all strings values
 return View();
}
- void Keep(string key) – Calling this method with in the current action ensures that specific item in TempData is not removed at the end of the current request.
<!-- wp:paragraph -->
<p>public ActionResult Index()<br>{<br>ViewBag.Message = TempData["Message"];<br>Employee emp = TempData["emp"] as Employee; //need type casting<br>//persist only data for emp key and Message key will be destroy<br>TempData.Keep("emp");<br>return View();<br>}</p>
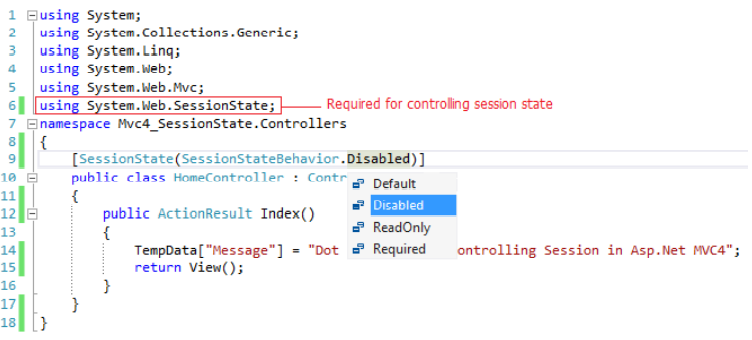
<!-- /wp:paragraph -->Q52. How to control Session behavior in ASP.NET MVC?
Ans. By default, ASP.NET MVC support session state. Session is used to store data values across requests.
Whether you store some data values with in the session or not ASP.NET MVC must manage the session state for
all the controllers in your application that is time consuming. Since, session is stored on server side and consumes
server memory, hence it also affect your application performance.
If some of the controllers of your ASP.NET MVC application are not using session state features, you can disable
session for those controller and can gain slight performance improvement of your application. You can simplify
session state for your application by using available options for session state.
In ASP.NET MVC4, SessionState attribute provides you more control over the behavior of session-state by
specifying the value of SessionStateBehavior enumeration as shown below:
| Value | Description |
| Default | The default ASP.NET behavior is used to determine the session state behavior |
| Disabled | Session state is disabled entirely |
| ReadOnly | Read-only session state behavior is enabled. |
| Required | Full read-write session state behavior is enabled. |
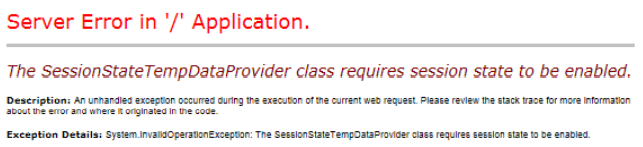
Q53. How TempData is related to Session in ASP.NET MVC?
Ans. In ASP.NET MVC, TempData use session state for storing the data values across requests. Hence, when
you will disabled the session state for the controller, it will throw the exception as shown below:
Q54. What are Action methods in ASP.NET MVC?
Ans. Controller actions are methods defined in the controller class and responsible to perform required
operations on the user’s inputs like as form values, query strings values etc. with the help of Model and passing
the results back to the View. Asp.net MVC has the following built-in ActionResults Type and Helper methods:
- ViewResult – Returns a ViewResult which renders the specified or default view by using controller View()
helper method. - PartialViewResult- Returns a PartialViewResult which renders the specified or default partial view (means
a view without its layout) by using controller PartialView() helper method. - RedirectResult – Returns a RedirectResult which Issues an HTTP 301 or 302 redirection to a specific URL
by using controller Redirect() helper method. - RedirectToRouteResult – Returns a RedirectToRouteResult which Issues an HTTP 301 or 302 redirection
to an action method or specific route entry by using controller RedirectToAction(),
RedirectToActionPermanent(), RedirectToRoute(), RedirectToRoutePermanent() helper methods. - ContentResult – Returns a ContentResult which renders raw text like as “Hello, DotNet Tricks!” by using
controller Content() helper method. - JsonResult – Returns a JsonResult which serializes an object in JSON format ( like as “{ “Message”: Hello,
World! }”) and renders it by using controller Json() helper method. - JavaScriptResult – Returns a JavaScriptResult which renders a snippet of JavaScript code like as “function
hello() { alert(Hello, World!); }” by using controller JavaScript() helper method. This is used only in AJAX
scenarios. - FileResult – Returns a FileResult which renders the contents of a file like as PDF, DOC, Excel etc. by using
controller File() helper method. - EmptyResult – Returns no result returned by an action. This has no controller helper method.
- HttpNotFoundResult – Returns an HttpNotFoundResult which renders a 404 HTTP Status Code response
by using controller HttpNotFound() helper method. - HttpUnauthorizedResult – Returns an HttpUnauthorizedResult which renders a 401 HTTP Status Code
(means “not authorized”) response. This has no controller helper method. This is used for authentication
(forms authentication or Windows authentication) to ask the user to log in. - HttpStatusCodeResult – Returns an HttpStatusCodeResult which renders a specified HTTP code response.
This has no controller helper method.
Q55. What is Action Result and how is it different from others?
public ActionResult Index(int id)
{
 if (id == 1)
 return View(); // returns simple ViewResult
 else if (id == 2)
 return Json(new { result = "1" }, JsonRequestBehavior.AllowGet); //
returns JsonResult
 else
 return RedirectToAction("Login"); // returns to Login Page
}
Q56. How to make a Non-Action method in ASP.NET MVC?
Ans. By default, the ASP.NET MVC framework treats all public methods of a controller class as action methods.
If you do not want a public method to be an action method, you must mark that method with the
NonActionAttribute attribute.
[NonAction]
public void DoSomething()
{
 // Method logic
}
Q57. Can you change action method name?
Ans. You can also change action method name by using ActionName attribute. Now action method will be
called by the name defined by the ActionName attribute.
[ActionName("DoAction")]
public ActionResult DoSomething()
{
 //TODO:
 return View();
}
Now, DoSomething action will be identified and called by the name DoAction.
Q58. How to restrict an action method to be invoked only by HTTP GET, POST, PUT or
DELETE?
Ans. By default, each and every action method can be invoked by any HTTP request (i.e. GET, PUT, POST, and
DELETE). But you can restrict an action to be invoked only by a specific HTTP request by applying HttpGet or
HttpPost or HttpPut or HttpDelete attribute.
If you want to restrict an action method for HTTP Get request only then decorate it with HttpGet action method
selector attribute as given below:
[HttpGet]
public ActionResult Index()
{
 //TODO:
 return View();
}
Q59. How to determine an action method is invoked by HTTP GET or POST?
Ans. By using HttpMethod property of HttpRequestBase class, you can find out whether an action is invoked
by HTTP GET or POST.
public ActionResult Index(int? id)
{
 if (Request.HttpMethod == "GET")
 {
 //TODO:
 }
 else if (Request.HttpMethod == "POST")
 {
 //TODO:
 }
 else
 {
 //TODO:
 }
return View();
}
Q60. How to determine an AJAX request?
Ans. You can determine an AJAX request by using Request.IsAjaxRequest() method. It will return true, if the
request is an AJAX request else returns false.
public ActionResult DoSomething()
{
 if (Request.IsAjaxRequest())
 {
 //TODO:
 }
 return View();
}
Q61. What is Data Annotations in ASP.NET MVC?
Ans. Data validation is a key aspect for developing web application. In Asp.net MVC, we can easily apply
validation to web application by using Data Annotation attribute classes to model class. Data Annotation attribute
classes are present in System.ComponentModel.DataAnnotations namespace and are available to Asp.net
projects like Asp.net web application & website, Asp.net MVC, Web forms and also to Entity framework ORM
models.
Data Annotations help us to define the rules to the model classes or properties for data validation and displaying
suitable messages to end users
Data Annotation Validator Attributes
- DataType – Specify the datatype of a property
- DisplayName – specify the display name for a property.
- DisplayFormat – specify the display format for a property like different format for Date property.
- Required – Specify a property as required.
- ReqularExpression – validate the value of a property by specified regular expression pattern.
- Range – validate the value of a property within a specified range of values.
- StringLength – specify min and max length for a string property.
- MaxLength – specify max length for a string property.
- Bind – specify fields to include or exclude when adding parameter or form values to model properties.
- ScaffoldColumn – specify fields for hiding from editor forms
Q62. How to apply Server side validation in ASP.NET MVC?
Ans. Server side validations are very important before playing with sensitive information of a user. Server-side
validation must be done whether we validate the received data on the client side. User could disable script in his
browser or do something else to bypass client-side validation. In this case server-side validation must require to
protect our data from dirty input.
In ASP.NET MVC, there are two ways to validate a model on server side:
- Explicit Model Validation – This is the traditional way to validate the model data by using IF..Else..IF
statement. In this way, you need to check your model property values one by one for your desired result.
If model property values are unexpected, inject error messages within ModelState.
class HomeController : Controller
{
 [HttpPost]
 public ActionResult ExplicitServer(UserViewModel model)
 {
 //Write custom logic to validate UserViewModel
 if (string.IsNullOrEmpty(model.UserName))
 {
 ModelState.AddModelError("UserName", "Please enter your
name");
 }
 if (!string.IsNullOrEmpty(model.UserName))
 {
 Regex emailRegex = new Regex(".+@.+\\..+");
 if (!emailRegex.IsMatch(model.UserName))
 ModelState.AddModelError("UserName", "Please enter correct
email address");
 }

 if (ModelState.IsValid) //Check model state
 {
 //TO DO:
 }
 }
}- Model Validation with Data Annotations – Data Annotations was introduced with .NET 3.5 SP1. It has a
set of attributes and classes defined in the System.ComponentModel.DataAnnotations assembly. Data
Annotations allow us to decorate model classes with metadata. This metadata describes a set of rules that
are used to validate a property.
public class UserViewModel
{
 [Required(ErrorMessage = "Please Enter Email Address")]
 [RegularExpression(".+@.+\\..+", ErrorMessage = "Please Enter Correct
Email Address")]
 public string UserName { get; set; }
 [Required(ErrorMessage = "Please Enter Password")]
 [StringLength(50, ErrorMessage = "The {0} must be at least {2}
characters long.", MinimumLength = 6)]
 public string Password { get; set; }
}
Q63. How to determine there is no error in Model State?
Ans. When server side model validation fails, errors are included in the ModelState. Hence, by using
ModelState.IsValid property you can verify model state. It returns true if there is no error in ModelState else
returns false.
[HttpPost]
public ActionResult DoSomething(UserViewModel model)
{
 if (ModelState.IsValid)
 {
 //TODO:
 }
return View();
}
Q64. How to enable and disable client-side validation in ASP.NET MVC?
Ans. We can enable and disable the client-side validation by setting the values of ClientValidationEnabled &
UnobtrusiveJavaScriptEnabled keys true or false. This setting will be applied to application level
<add key="ClientValidationEnabled" value="true" />
<add key="UnobtrusiveJavaScriptEnabled" value="true" />
For client-side validation, the values of above both the keys must be true. When we create new project using
Visual Studio in MVC3 or MVC4, by default the values of both the keys are set to true
We can also enable the client-side validation programmatically. For this we need to do code with in the
Application_Start() event of the Global.asax, as shown below.
protected void Application_Start()
{
 //Enable or Disable Client Side Validation at Application Level
 HtmlHelper.ClientValidationEnabled = true;
 HtmlHelper.UnobtrusiveJavaScriptEnabled = true;
}
We can also enable or disable client-side validation for a specific view. For this we required to enable or disable
client side validation inside a Razor code block as shown below. This option will overrides the application level
settings for that specific view.
@using MvcApp.Models
@{
 ViewBag.Title = "About";
 HtmlHelper.ClientValidationEnabled = false;
}
Q65. What is a CDN and advantages of CDN?
Ans. CDN stands for content delivery network or content distribution network (CDN) which is a large
distributed system of servers deployed in multiple data centers across the Internet. The goal of a CDN is to serve
the content (like jQuery library and other open source libraries) to end-users with high availability and high
performance.
There are three popular CDN – Google, Microsoft and jQuery.
// Google CDN
<scripttype="text/javascript"src="http://ajax.googleapis.com/ajax/libs/jquery/1.9
.1/jquery.min.js"></script>
// Microsoft CDN
<scripttype="text/javascript"src="http://ajax.microsoft.com/ajax/jquery/jquery1.9.1.min.js"></script>
// JQuery CDN
<scripttype="text/javascript"src="http://code.jquery.com/jquery1.9.1.min.js">
Advantages
- It reduces the load from your application server.
- It saves bandwidth since jQuery and other open libraries/framework will load faster from these CDN.
- The most important benefit is it will be cached means if a user has visited any site which is using jQuery
framework from any of these CDN and your web application is also using the same CDN for serving the jQuery
then for your application, it will not request the jQuery from CDN.
Q66. What is jquery.validate.unobtrusive.js?
Or
What is jQuery Validation Unobtrusive plugin?
Ans. Microsoft introduced jquery.validate.unobtrusive.js plugin with ASP.NET MVC3 to apply data model
validations to the client side using a combination of jQuery Validation and HTML 5 data attributes.
Q67. What is Bundling and Minification in ASP.NET MVC?
Ans. ASP.NET MVC4 and .NET Framework 4.5 offer bundling and minification techniques that reduce the
number of request to the server and size of requested CSS and JavaScript, which improve page loading time
A bundle is a logical group of files that is loaded with a single HTTP request. You can create style and script bundle
for CSS and Java Scripts respectively by calling BundleCollection class Add() method. All bundles are create with in
BundleConfig.cs file.
public class BundleConfig
{
 public static void RegisterBundles(BundleCollection bundles)
 {
 bundles.Add(new
StyleBundle("~/Content/css").Include("~/Content/site.min.css",
 "~/Content/mystyle.min.css"));
 bundles.Add(new ScriptBundle("~/bundles/jqueryval").Include(
 "~/Scripts/jquery-1.7.1.min.js",
 "~/Scripts/jquery.validate.min.js",
 "~/Scripts/jquery.validate.unobtrusive.min.js"));
 }
}
Minification is technique for removing unnecessary characters (like white space, newline, tab) and comments
from the JavaScript and CSS files to reduce the size which cause improved load times of a webpage. There are so
many tools for minifying the js and css files. JSMin and YUI Compressor are two most popular tools for minifying
js and css files.
CSS and JS files Without Bundling and Minification
Suppose you have below CSS and JS files on the layout page and run the application in chrome browser and test
no of request and loading time using chrome developer tools as shown below
<link href="~/Content/Site.css" rel="stylesheet"/>
<link href="~/Content/MyStyle.css" rel="stylesheet"/>
<script src="~/Scripts/jquery-1.7.1.js"></script>
<script src="~/Scripts/jquery-ui-1.8.20.js"></script>
<script src="~/Scripts/jquery.validate.js"></script>
<script src="~/Scripts/jquery.validate.unobtrusive.js"></script>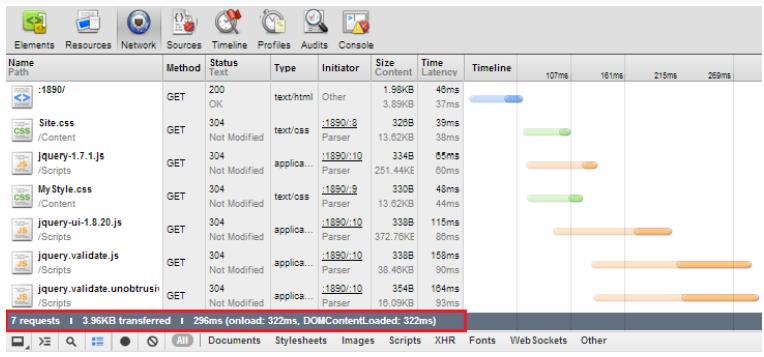
In this test, there are 7 request, total data size is 3.96KB and loading time is approximate 296ms
CSS and JS files with Bundling and Minification
When you will run the above application with Bundling and Minification of css and js files and test no of request
and loading time using chrome developer tools as shown below.
@Styles.Render("~/Content/css")
@Scripts.Render("~/bundles/jquery")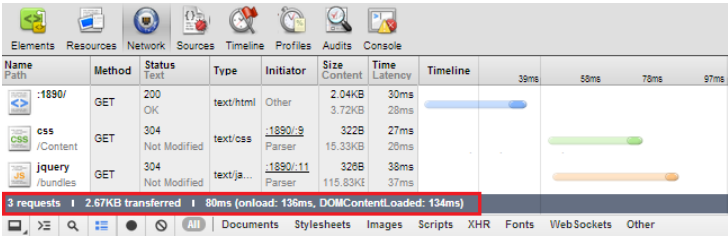
In this test, there are only 3 request, total data size is 2.67KB and loading time is approximate 80ms. In this way
by using bundling and minification you have reduced the total no of request, size and loading time.
Q68. Can we use Bundling and Minification in ASP.NET MVC3 or ASP.NET4.0?
Ans. System.Web.Optimization class offers the bundling and minification techniques that is exist within the
Microsoft.Web.Optimization dll. Using this dll you can also use this technique with ASP.NET MVC3 and .NET
Framework 4.0
Q69. How Bundling use browser Cache capability?
Ans. Browsers cache resources based on URLs. When a web page requests a resource, the browser first checks
its cache to see if there is a resource with the matched URL. If yes, then it simply uses the cached copy instead of
fetching a new one from server. Hence whenever you change the content of CSS and JS files will not reflect on the
browser. For this you need to force the browser for refreshing/reloading.

But bundles automatically takes care of this problem by adding a hash code to each bundle as a query parameter
to the URL as shown below. Whenever you change the content of CSS and JS files then a new has code will be
generated and rendered to the page automatically. In this way, the browser will see a different Url and will fetch
the new copy of CSS and JS.
Q70. What is Partial View in ASP.NET MVC?
Ans. A partial view is like as user control in ASP.NET Web forms that is used for code re-usability. Partial views
helps us to reduce code duplication. Hence partial views are reusable views like as Header and Footer views.
We can use partial view to display blog comments, product category, social bookmarks buttons, a dynamic ticker,
calendar etc.
It is best practice to create partial view in the shared folder and partial view name is preceded by ““, but it is not mandatory. The “” before view name specify that it is a reusable component i.e. partial view.
Q71. How do you return a partial view from controller?
Ans. return PartialView(options); where options could be a Model or a View name
Q72. What are different ways of rendering a Partial View in ASP.NET MVC?
Ans. There are four methods for rendering a partial view in ASP.NET MVC These are RenderPartial,
RenderAction, Partial and Action helper methods.
Html.RenderPartial
- This method result will be directly written to the HTTP response stream means it used the same TextWriter object as used in the current webpage/template.
- This method returns void.
- Simple to use and no need to create any action.
- RenderPartial method is useful when the displaying data in the partial view is already in the corresponding view model. For example: In a blog to show comments of an article, you can use RenderPartial method since an article information with comments are already populated in the view model.
@{Html.RenderPartial("_Comments");}- This method is faster than Partial method since its result is directly written to the response stream which makes it fast.
Html.RenderAction
- This method result will be directly written to the HTTP response stream means it used the same TextWriter object as used in the current webpage/template.
- For this method, we need to create a child action for the rendering the partial view.
- RenderAction method is useful when the displaying data in the partial view is independent from corresponding view model. For example: In a blog to show category list on each and every page, we would like to use RenderAction method since the list of category is populated by the different model.
@{Html.RenderAction("Category","Home");}- This method is the best choice when you want to cache a partial view.
- This method is faster than Action method since its result is directly written to the HTTP response stream which makes it fast.
Html.Partial
- Renders the partial view as an HTML-encoded string.
- This method result can be stored in a variable, since it returns string type value.
- Simple to use and no need to create any action.
- Like RenderPartial method, Partial method is also useful when the displaying data in the partial view is already in the corresponding view model. For example: In a blog to show comments of an article, you can use Partial method since an article information with comments are already populated in the view model
@Html.Partial("_Comments")
Html.Action
- Renders the partial view as an HtmlString.
- For this method, we need to create a child action for the rendering the partial view.
- This method result can be stored in a variable, since it returns string type value.
- Action method is useful when the displaying data in the partial view is independent from corresponding view model. For example: In a blog to show category list on each and every page, we would like to use Action method since the list of category is populated by the different model.
@{Html.Action("Category","Home");}- This method is also the best choice when you want to cache a partial view.
Q73. What is Area in ASP.NET MVC?
Ans. Areas was introduced in Asp.net MVC2 which allow us to organize models, views, and controllers into
separate functional sections of the application, such as administration, billing, customer support, and so on. This
is very helpful in a large web application, where all the controllers, views, and models have a single set of folders
and that become difficult to manage.
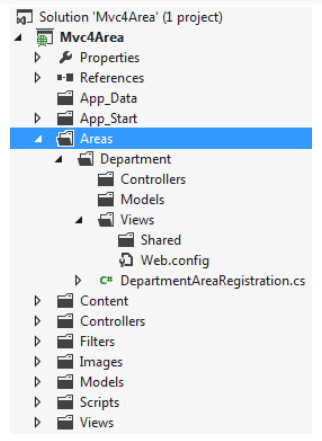
Each MVC area has its own folder structure which allow us to keep separate controllers, views, and models. This
also helps the multiple developers to work on the same web application without interfere to one another.
Q74. How to register Area in ASP.NET MVC?
Ans. Before working with area, make sure you have registered your area with in the Application_Start
method in Global.asax as shown below.
protected void Application_Start()
{
 //Register all application Areas
 AreaRegistration.RegisterAllAreas();
}
Always remember the order of registering the Areas must be on top, so that all of the settings, filters and routes
registered for the applications will also apply on the Areas.
Q75. What is Child action and how to invoke it?
Ans. Child actions are useful for creating reusable widgets which could be embedded into your views. In
ASP.NET MVC partial views are used to create reusable widgets and a partial can be render by an action method.
This action method can has child attribute and has itsindependent MVC lifecycle from parent view. Also, an action
which has child attribute cannot be called independently. It always will be called within a parent view otherwise
it would give error.
[ChildActionOnly]
public ActionResult MenuBar()
{
 //TODO:
 return PartialView();
}
A child action is invoked by using @Html.RenderAction or @Html.Action helper methods from inside of a view.
Q76. What is Scaffolding?
Ans. Scaffolding is a technique used by many MVC frameworks like ASP.NET MVC, Ruby on Rails, Cake PHP
and Node.JS etc., to generate code for basic CRUD (create, read, update, and delete) operations against your
database effectively. Further you can edit or customize this auto generated code according to your need.
Scaffolding consists of page templates, entity page templates, field page templates, and filter templates. These
templates are called Scaffold templates and allow you to quickly build a functional data-driven Web site
Q77. How Scaffold templates works in ASP.NET MVC?
Ans. Scaffold templates are used to generate code for basic CRUD operations within your ASP.NET MVC
applications against your database with the help Entity Framework. These templates use the Visual Studio T4
templating system to generate views for basic CRUD operations with the help of Entity Framework.
Steps to create ASP.NET MVC CRUD operations using scaffolding in ASP.NET MVC:
Step1: Adding controller to your project
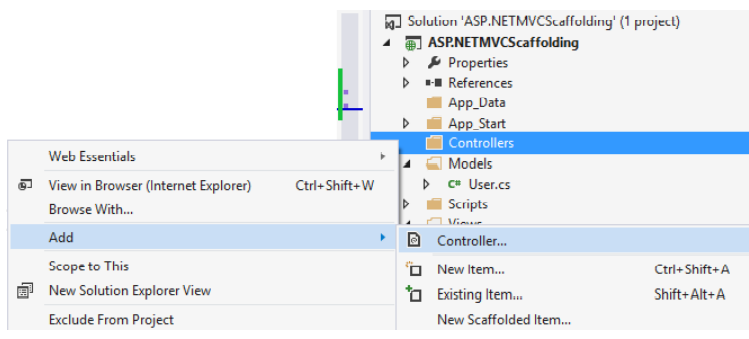
Step2: Choosing a scaffold template for creating CRUD operations
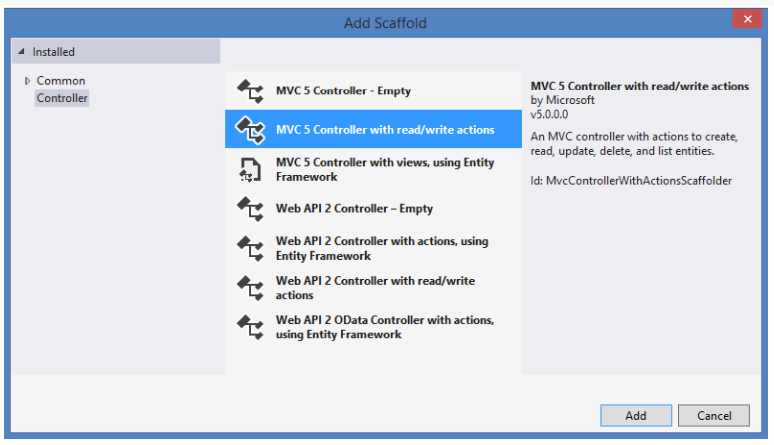
Step3: Provide a name to your controller
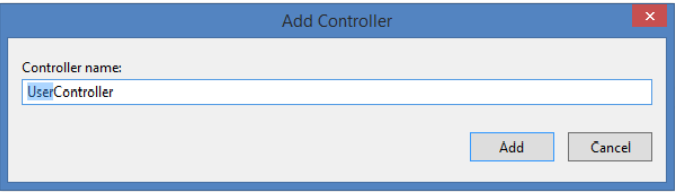
The following actions are created for insert, update and delete operations based on scaffold template within User
controller.
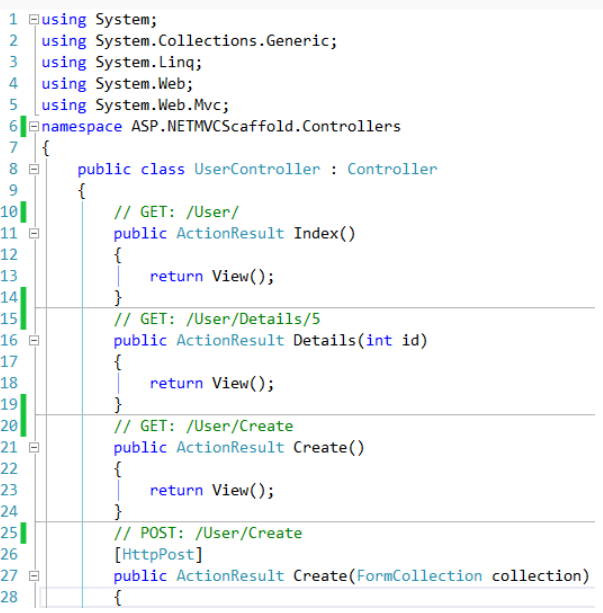
Q78. What are ASP.NET MVC Filters and Attributes?
Ans. ASP.NET MVC provides a simple way to inject your piece of code or logic either before or after an action
is executed. This is achieved by decorating the controllers or actions with ASP.NET MVC attributes or custom
attributes. An attribute or custom attribute implements the ASP.NET MVC filters (filter interface) and can contain
your piece of code or logic. You can make your own custom filters or attributes either by implementing ASP.NET
MVC filter interface or by inheriting and overriding methods of ASP.NET MVC filter attribute class if available
Typically, Filters are used to perform the following common functionalities in your ASP.NET MVC application.
- Custom Authentication
- Custom Authorization (User based or Role based)
- Error handling or logging
- User Activity Logging
- Data Caching
- Data Compression
Q79. What are different types of Filters in ASP.NET MVC?
Ans. The ASP.NET MVC framework provides five types of filters
- Authentication Filters – This filter is introduced with ASP.NET MVC5. The IAuthenticationFilter interface is
used to create CustomAuthentication filter. The definition of this interface is given below.
public interface IAuthenticationFilter
{
 void OnAuthentication(AuthenticationContext filterContext);
 void OnAuthenticationChallenge(AuthenticationChallengeContext
filterContext);
}
You can create your CustomAuthentication filter attribute by implementing IAuthenticationFilter as shown
below
public class CustomAuthenticationFilterAttribute : FilterAttribute,
IAuthenticationFilter
{
 public void OnAuthentication(AuthenticationContext filterContext)
 {
 filterContext.HttpContext.Response.Write("Authentication
Filter<br/>");
 }
 //Runs after the OnAuthentication method
 public void OnAuthenticationChallenge(AuthenticationChallengeContext
filterContext)
 {
 //TODO: Additional tasks on the request
 }
}- Authorization Filters – The ASP.NET MVC Authorize filter attribute implements the IAuthorizationFilter
interface. The definition of this interface is given below.
public interface IAuthorizationFilter
{
 void OnAuthorization(AuthorizationContext filterContext);
}
The AuthorizeAttribute class provides the following methods to override in the CustomAuthorize attribute
class.
public class AuthorizeAttribute : FilterAttribute, IAuthorizationFilter
{
 protected virtual bool AuthorizeCore(HttpContextBase httpContext);
 protected virtual void HandleUnauthorizedRequest(AuthorizationContext
filterContext);
 public virtual void OnAuthorization(AuthorizationContext filterContext);
 protected virtual HttpValidationStatus
OnCacheAuthorization(HttpContextBase httpContext);
}
In this way you can make your CustomAuthorize filter attribute either by implementing IAuthorizationFilter
interface or by inheriting and overriding above methods of AuthorizeAttribute class.
- Action Filters – Action filters are executed before or after an action is executed. The IActionFilter interface is
used to create an Action Filter which provides two methods OnActionExecuting and OnActionExecuted which
will be executed before or after an action is executed respectively.
public interface IActionFilter
{
 void OnActionExecuting(ActionExecutingContext filterContext);
 void OnActionExecuted(ActionExecutedContext filterContext);
}- Result Filters – Result filters are executed before or after generating the result for an action. The Action Result
type can be ViewResult, PartialViewResult, RedirectToRouteResult, RedirectResult, ContentResult, JsonResult,
FileResult and EmptyResult which derives from the ActionResult class. Result filters are called after the Action
filters. The IResultFilter interface is used to create a Result Filter which provides two methods
OnResultExecuting and OnResultExecuted which will be executed before or after generating the result for an
action respectively.
public interface IResultFilter
{
 void OnResultExecuted(ResultExecutedContext filterContext);
 void OnResultExecuting(ResultExecutingContext filterContext);
}
- Exception Filters – Exception filters are executed when exception occurs during the actions execution or filters
execution. The IExceptionFilter interface is used to create an Exception Filter which provides OnException
method which will be executed when exception occurs during the actions execution or filters execution,
public interface IExceptionFilter
{
 void OnException(ExceptionContext filterContext);
}
The HandleErrorAttribute class is one example of an exception filter which implements IExceptionFilter. When HandleError filter receives the exception it returns an Error view located in the Views/Shared folder of your ASP.NET MVC application.
Q80. When Exception filters are executed in ASP.NET MVC?
Ans. Exception filters are executed if there is an unhandled exception thrown during the execution of the ASP.NET MVC pipeline
Q81. What is the order of execution of filters in ASP.NET MVC?
Ans. All ASP.NET MVC filter are executed in an order. The correct order of execution is given below:
- Authentication filters
- Authorization filters
- Action filters
- Result filters
Q82. How to configure filters in ASP.NET MVC?
Ans. You can configure your own custom filter into your application at following three levels:
- Global level – By registering your filter into Application_Start event of Global.asax.cs file with the help of FilterConfig class.
protected void Application_Start()
{
 FilterConfig.RegisterGlobalFilters(GlobalFilters.Filters);
}- Controller level – By putting your filter on the top of the controller name as shown below-
[Authorize(Roles = "Admin")]
public class AdminController : Controller
{
 //TODO:
}
- Action level – By putting your filter on the top of the action name as shown below
public class UserController : Controller
{
 [Authorize(Users = "User1,User2")]
 public ActionResult LinkLogin(string provider)
 {
 // TODO:
 return View();
 }
}
Q83. How Authentication and Authorization work in ASP.NET MVC?
Ans. Like ASP.NET, MVC also supports Windows and Forms authentication. You can configure both the
authentications by using Web.config or doing some custom code.
Q84. How Forms Authentication and Authorization work in ASP.NET MVC?
Ans. Like ASP.NET, MVC Forms authentication occurs after IIS authentication is completed. It can be configure
by using forms element within Web.config file of your ASP.NET MVC application. The default attribute values for
forms authentication are shown below:
<system.web>
<authentication mode="Forms">
<forms loginUrl="Login.aspx"
protection="All"
timeout="30"
name=".ASPXAUTH"
path="/"
requireSSL="false"
slidingExpiration="true"
defaultUrl="default.aspx"
cookieless="UseDeviceProfile"
enableCrossAppRedirects="false" />
</authentication>
</system.web>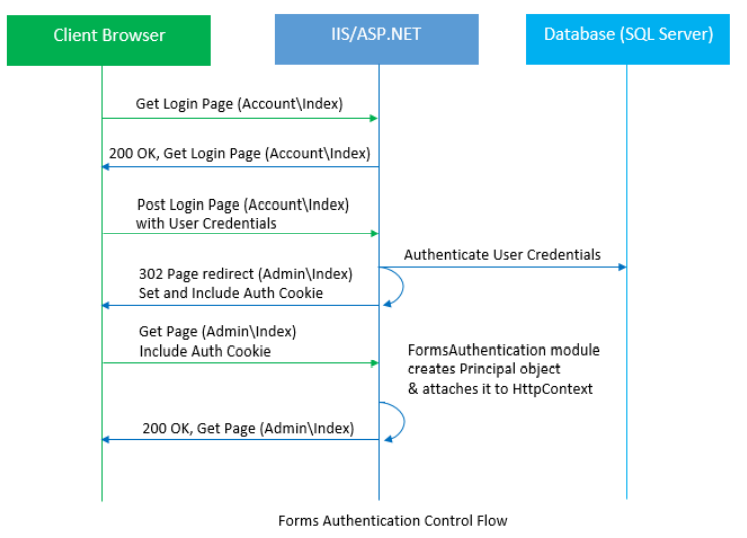
The FormsAuthentication class creates the authentication cookie automatically when SetAuthCookie() or
RedirectFromLoginPage() methods are called. The value of authentication cookie contains a string representation
of the encrypted and signed FormsAuthenticationTicket object
You can create the FormsAuthenticationTicket object by specifying the cookie name, version of the cookie,
directory path, issue date of the cookie, expiration date of the cookie, whether the cookie should be persisted,
and optionally user-defined data as shown below:
FormsAuthenticationTicket ticket = new FormsAuthenticationTicket(1, "userName",
DateTime.Now,
DateTime.Now.AddMinutes(30), // value of time out property
false, // Value of IsPersistent property
String.Empty, FormsAuthentication.FormsCookiePath);
Now, you can encrypt this ticket by using the Encrypt method FormsAuthentication class as given below:
string encryptedTicket = FormsAuthentication.Encrypt(ticket);
Q85. How to implement custom Forms Authentication and Authorization in MVC?
Ans. When standard types of authentication do not meet your requirements, you need to modify an
authentication mechanism to create a custom solution. A user context has principal which represents the identity
and roles for that user. A user is authenticated by its identity and assigned roles to a user determine about
authorization or permission to access resources.
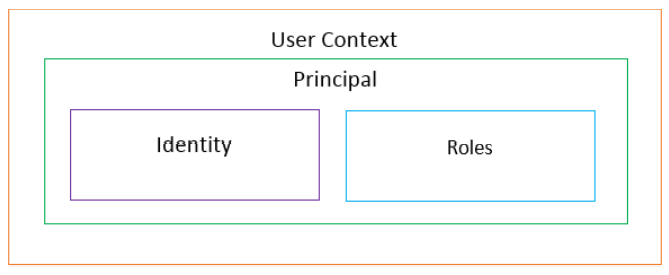
public class CustomPrincipal : IPrincipal
{
 public IIdentity Identity { get; private set; }
 public bool IsInRole(string role)
 {
 if (roles.Any(r => role.Contains(r)))
 {
 return true;
 }
 else
 {
 return false;
 }
 }
 public CustomPrincipal(string Username)
 {
 this.Identity = new GenericIdentity(Username);
 }
 public int UserId { get; set; }
 public string FirstName { get; set; }
 public string LastName { get; set; }
 public string[] roles { get; set; }
}
Now you can put this CustomPrincipal objects into the thread’s CurrentPrincipal property and into the HttpContext’s User property to accomplish your custom authentication and authorization process.
A user will be authenticated if IsAuthenticated property returns true. For authenticating a user you can use one
of the following two ways:
- Thread.CurrentPrincipal.Identity.IsAuthenticated
- HttpContext.Current.User.Identity.IsAuthenticated
ASP.NET MVC provides Authorization filter to authorize a user. This filter can be applied to an action, a controller, or even globally. This filter is based on Authorize Attribute class. You can customize this filter by overriding On Authorization() method as shown below:
public class CustomAuthorizeAttribute : AuthorizeAttribute
{
 protected virtual CustomPrincipal CurrentUser
 {
 get { return HttpContext.Current.User as CustomPrincipal; }
 }
 public override void OnAuthorization(AuthorizationContext filterContext)
 {
 if (filterContext.HttpContext.Request.IsAuthenticated)
 {

 if (!String.IsNullOrEmpty(Roles))
 {
 if (!CurrentUser.IsInRole(Roles))
 {
 filterContext.Result = new RedirectToRouteResult(new
 RouteValueDictionary(new { controller = "Error", action =
"AccessDenied" }));
 // base.OnAuthorization(filterContext); //returns to login url
 }
 }
 if (!String.IsNullOrEmpty(Users))
 {
 if (!Users.Contains(CurrentUser.UserId.ToString()))
{
 filterContext.Result = new RedirectToRouteResult(new
 RouteValueDictionary(new { controller = "Error", action =
"AccessDenied" }));
 // base.OnAuthorization(filterContext); //returns to login url
 }
 }
 }
 }
 }
Now you can apply this custom authorization filter at controller or action level for authorization as shown below:
[CustomAuthorize(Roles= "Admin")]
public class AdminController : BaseController
{
 public ActionResult Index()
 {
 return View();
 }
}
Q86. How to allow HTML tags in ASP.NET MVC?
Ans. By default ASP.NET MVC doesn’t allow a user to submit html for avoiding Cross Site Scripting attack to
your application. You can achieve it by using ValidateInput attribute and AllowHtml attribute.
ValidateInput attribute can enable or disable input validation at the controller level or at any action method
[ValidateInput(false)]
public class HomeController : Controller
{
 public ActionResult AddArticle()
 {
 return View();
 }
}
ValidateInput attribute allow the Html input for all the properties and that is unsafe. Since you have enable Html
input for only one-two properties then how to do this. To allow Html input for a single property, you should use
AllowHtml attribute.
public class BlogModel
{
 [Required]
 [Display(Name = "Title")]
 public string Title { get; set; }
 [AllowHtml]
 [Required]
 [Display(Name = "Description")]
 public string Description { get; set; }
}
Q87. What is caching and when to use it?
Ans. Caching is a most important aspect of high-performance web application. Caching provides a way of
storing frequently accessed data and reusing that data. Practically, this is an effective way for improving web
application’s performance.
When to use caching
- Use caching for contents that are accessed frequently.
- Avoid caching for contents that are unique per user.
- Avoid caching for contents that are accessed infrequently/rarely.
- Use the VaryByCustom function to cache multiple versions of a page based on customization aspects of the request such as cookies, role, theme, browser, and so on.
- For efficient caching use 64-bit version of Windows Server and SQL Server.
- For database caching make sure your database server has sufficient RAM otherwise, it may degrade the performance.
- For caching of dynamic contents that change frequently, define a short cache–expiration time rather than disabling caching
Q88. What are advantages of caching?
Ans. There are following advantages of caching:
- Reduce hosting server round-trips
- When content is cached at the client or in proxies, it cause minimum request to server.
- Reduce database server round-trips
- When content is cached at the web server, it can eliminate the database request.
- Reduce network traffic
- When content is cached at the client side, it also reduce the network traffic.
- Avoid time-consumption for regenerating reusable content
- When reusable content is cached, it avoid the time consumption for regenerating reusable content.
- Improve performance
- Since cached content reduce round-trips, network traffic and avoid time consumption for regenerating reusable content which cause a boost in the performance.
Q89. What is output caching?
Ans. The OutputCache filter allow you to cache the data that is output of an action method. By default, this
attribute filter cache the data till 60 seconds. After 60 sec, ASP.NET MVC will execute the action method again and
cache the output again.
class HomeController : Controller
{
 [OutputCache(Duration = 20, VaryByParam = "none")]
 public ActionResult Index()
 {
 ViewBag.Message = DateTime.Now.ToString();
 return View();
 }
}
The output of the Index() action method will be cached for 20 seconds. If you will not defined the duration, it will
cached it for by default cache duration 60 sec
Output Caching Location
By default, content is cached in three locations: the web server, any proxy servers, and the user’s browser. You
can control the content’s cached location by changing the location parameter of the OutputCache attribute to any
of the following values: Any, Client,Downstream, Server, None, or ServerAndClient
By default, the location parameter has the value Any which is appropriate for most the scenarios. But sometimes
there are scenarios when you required more control over the cached data.
Q90. What is Donut caching and Donut hole caching in ASP.NET MVC?
Ans. Donut caching cache an entire web page except for one or more parts of the web page. Before Donut caching, we have Output Caching which cache the entire web page
When to use Donut caching
Suppose, you have a web application in which some pages like HomePage,Tools etc. are same for all the users
excepts the user’s logged in details like username.
If you want to cache all these pages for all the users by using OutputCache with VaryByParam UserID, then the
entire page would be cached every time for each user with a different user name (or whatever your dynamic part
of the page is). This is not a good practice since there will be 1000 cached pages if there are 1000 logged in user
at a time.
To resolve this issue, Donut Caching was introduced which cached only one copy of the entire page for all the user
except for a small part which remain dynamic. This small part act like as a hole in the cached content and much
like a donut.
Donut caching is very useful in the scenarios where most of the elements in your page are rarely changed except
the few sections that dynamically change, or changed based on a request parameter.
Donut Hole caching
Donut Hole Caching is the inverse of Donut caching means while caching the entire page it cached only a small
part of the page (the donut hole).
When to use Donut Hole caching
Suppose, you have a web application in which ProductCategory is shown on each and every pages so it makes
sense to render all of the categories just once and cache the resulting HTML by using Donut Hole Caching
Donut Hole caching is very useful in the scenarios where most of the elements in your page are dynamic except
the few sections that rarely change, or changed based on a request parameter. ASP.NET MVC has great support
for Donut Hole caching through the use of Child Actions
class HomeController : Controller
{
 [ChildActionOnly]
 [OutputCache(Duration = 60)]
 public ActionResult CategoriesList()
 {
 // Get categories list from the database and
 // pass it to the child view
 ViewBag.Categories = GetCategories();
 return View();
 }
}
Q91. What is loose coupling and how is it possible?
Ans. One of the most important features of the MVC design pattern is that it enables separation of concerns.
Hence you can make your application’s components independent as much as possible. This is known as loose
coupling, and it makes testing and maintenance of our application easier. Using Dependency Injection you can
make you application’s components more loosely coupled.
Q92. What are Dependency Inversion Principle (DIP) and IoC?
Ans. The Dependency Inversion Principle states that:
- High level modules should not depend upon low level modules. Both should depend upon abstractions.
- Abstractions should not depend upon details. Details should depend upon abstractions.
The Dependency Inversion principle (DIP) helps us to develop loosely couple code by ensuring that high-level
modules depend on abstractions rather than concrete implementations of lower-level modules. The Inversion of
Control pattern is an implementation of this principle.
The term Inversion of Control (IoC) refers to a programming style where a framework or runtime, controls the
program flow. Inversion of control means we are changing the control from normal way. It works on Dependency
Inversion Principle. The most software developed on the .NET Framework uses IoC
More over IoC is a generic term and it is not limited to DI. Actually, DI and Service Locator patterns are specialized
versions of the IoC pattern or you can say DI and Service Locator are the ways of implementing IoC.
For example, suppose your Client class needs to use a Service class component, then the best you can do is to
make your Client class aware of an IService interface rather than a Service class. In this way, you can change the
implementation of the Service class at any time (and for how many times you want) without breaking the host
code.
IoC and DIP
DIP says High level module should not depend on low level module and both should depend on abstraction. IoC is
a way that provide abstraction. A way to change the control. IoC gives some ways to implement DIP. If you want
to make independent higher level module from the lower level module then you have to invert the control so that
low level module do not control interface and creation of object. Finally IoC gives some way to invert the control.
Q93. What is Dependency Injection (DI)?
Ans. DI is a software design pattern that allow us to develop loosely coupled code. DI is a great way to reduce
tight coupling between software components. DI also enables us to better manage future changes and other
complexity in our software. The purpose of DI is to make code maintainable.
The Dependency Injection pattern uses a builder object to initialize objects and provide the required dependencies
to the object means it allows you to “inject” a dependency from outside the class.
For example, suppose your Client class needs to use a Service class component, then the best you can do is to
make your Client class aware of an IService interface rather than a Service class. In this way, you can change the
implementation of the Service class at any time (and for how many times you want) without breaking the host
code.
Q94. What is Service Locator?
Ans. Service Locator is a software design pattern that also allow us to develop loosely coupled code. It
implements the DIP principle and easier to use with an existing codebase as it makes the overall design looser
without forcing changes to the public interface.
The Service Locator pattern introduces a locator object that objects is used to resolve dependencies means it
allows you to “resolve” a dependency within a class. Above example can be re-written as follows by using SL.
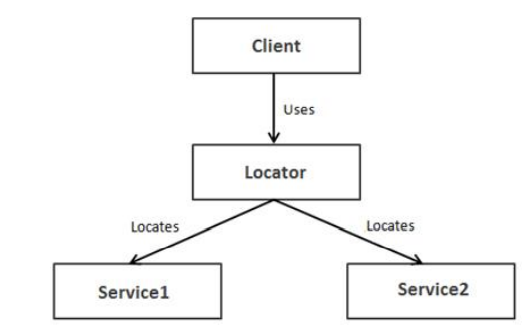
 public interface IService
{
 void Serve();
}
public class Service : IService
{
 public void Serve()
 {
 Console.WriteLine("Service Called");
 //To Do: Some Stuff
 }
}
public static class LocateService
{
 public static IService _Service { get; set; }
 public static IService GetService()
 {
 if (_Service == null)
 _Service = new Service();
 return _Service;
 }
}
public class Client
{
 private IService _service;
 public Client()
 {
 this._service = LocateService.GetService();
 }
 public void Start()
 {
 Console.WriteLine("Service Started");
 this._service.Serve();
 //To Do: Some Stuff
 }
}
class Program
{
 static void Main(string[] args)
 {
 var client = new Client();
 client.Start();
 Console.ReadKey();
 }
}
Q95. What are different ways to implement Dependency Injection (DI)?
Ans. There are three different ways to implement DI as given below:
- Constructor Injection – This is the most common DI. Dependency Injection is done by supplying the DEPENDENCY through the class’s constructor when instantiating that class. Injected component can be used anywhere within the class. Should be used when the injected dependency is required for the class to function. It addresses the most common scenario where a class requires one or more dependencies.
public interface IService
{
 void Serve();
}
public class Service : IService
{
 public void Serve()
 {
 Console.WriteLine("Service Called");
 //To Do: Some Stuff
 }
}
public class Client
{
 private IService _service;
 public Client(IService service)
 {
 this._service = service;
 }
 public void Start()
 {
 Console.WriteLine("Service Started");
 this._service.Serve();
 //To Do: Some Stuff
 }
}
//Builder
class Program
{
 static void Main(string[] args)
 {
 Client client = new Client(new Service());
 client.Start();
 Console.ReadKey();
 }
}- Property Injection – This is also called Setter injection. This is used when a class has optional dependencies, or where the implementations may need to be swapped. This is used by different logger implementations like Log4Net. It may require checking for a provided implementation throughout the class (need to check for null before using it). It does not require adding or modifying constructors
public interface IService
{
 void Serve();
}
public class Service : IService
{
 public void Serve()
 {
 Console.WriteLine("Service Called");
 //To Do: Some Stuff
 }
}
public class Client
{
 private IService _service;
 public IService Service
 {
 set
 {
 this._service = value;
 }
 }
 public void Start()
 {
 Console.WriteLine("Service Started");
 this._service.Serve();
 //To Do: Some Stuff
 }
}
//Builder
class Program
{
 static void Main(string[] args)
 {
 Client client = new Client();
 client.Service = new Service();
 client.Start();
 Console.ReadKey();
 }
}- Method Injection – This Inject the dependency into a single method, for use by that method only. It could be useful where the whole class does not need the dependency, just the one method.
public interface IService
{
 void Serve();
}
public class Service : IService
{
 public void Serve()
 {
 Console.WriteLine("Service Called");
 //To Do: Some Stuff
 }
}
public class Client
{
 private IService _service;
 public void Start(IService service)
 {
 this._service = service;
 Console.WriteLine("Service Started");
 this._service.Serve();
 //To Do: Some Stuff
 }
}
//Builder
class Program
{
 static void Main(string[] args)
 {
 Client client = new Client();
 client.Start(new Service());
 Console.ReadKey();
 }
}
Q96. What are advantages of Dependency Injection (DI)?
Ans. There are following advantages of DI:
- Reduces class coupling
- Increases code reusing
- Improves code maintainability
- Improves application testing
Q97. What is IoC or DI container?
Ans. The terms Dependency Injection (DI) & Inversion of Control (IoC) are generally used interchangeably to describe the same design pattern. Hence some people says IoC Container and some people says DI container but both terms indicate to the same thing. So don’t be confused from the terminology.
A DI Container is a framework to create dependencies and inject them automatically when required. It automatically creates objects based on request and inject them when required. DI Container helps us to manage dependencies with in the application in a simple and easy way.
We can also manage an application dependencies without a DI Container, but it will be like as POOR MAN’S DI and we have to do more work, to make it configured and manageable.
Q98. What are popular DI containers?
Ans. Today, there are a lot of excellent DI Containers that are available for .NET. The list of most useful DI
container for .NET framework is given below:
Castle Windsor
- Based on the Castle MicroKernel.
- Well documented and used by many.
- Understands Decorator
- Typed factories
- Commercial support available
Spring.NET
- INTERCEPTION
- Comprehensive documentation
- Commercial support available
Autofac
- Easy to learn API
- second-generation DI Container
- Commercial support available
Unity
- INTERCEPTION
- Good documentation
- Consistent API
Ninject
- Easy to learn API
- Second-generation DI Container
Q99. What is Test Driven Development (TDD)?
Ans. TDD is a methodology which says, write your tests first before you write your code. In TDD, tests drive
your application design and development cycles. You do not do the check-in of your code into source control until
all of your unit tests pass,
Q100. What are commonly used tool for Unit Testing in ASP.NET MVC?
Ans. ASP.NET MVC has been designed for testability without dependencies on the IIS server, on a database, or
on external classes. There are following popular tools for ASP.NET MVC testing:
- NUnit – This is the most popular unit testing frameworks for Microsoft .NET. Its syntax is relatively simpleand easy to use. It comes with a test runner GUI and a command-line utility. NUnit is also available as a NuGet package for download.
- xUnit.NET – This provides a way to run automated unit tests. It is simple, easily extended, and has a very clean syntax.
- Ninject 2 – This provides a way to wire up classes in your application.
- Moq – This provides a framework for mocking interfaces and classes during testing.